Water heater leaks can silently drain your wallet and damage your home before you even notice them. You might think you’d spot a major leak immediately, but most water heater failures start small—a tiny drip here, slight moisture there—gradually building into costly disasters. The key isn’t just knowing what to look for, but understanding when and how to check for these warning signs before they escalate.
Perform Regular Visual Inspections Around Your Water Heater
Since water heater leaks can cause significant property damage and costly repairs, you’ll want to establish a monthly inspection routine to catch problems early.
When you inspect your water heater, look for water pooling around the base or damp spots nearby. Check for signs of corrosion on the tank and fittings, which indicate potential structural weaknesses.
Examine inlet and outlet pipe connections for wear or loose fittings that could create visible leaks. Listen for unusual sounds like hissing or gurgling that may signal internal problems.
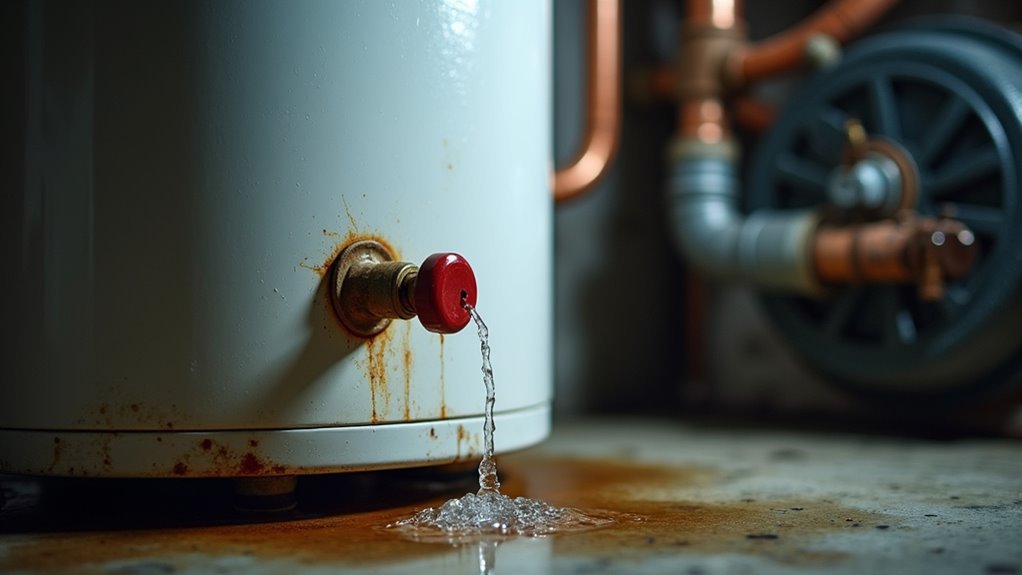
Don’t forget to regularly inspect the temperature and pressure relief valve, ensuring it functions properly and isn’t leaking, as valve failures create safety hazards and significant water loss.
Monitor for Pooling Water and Moisture Buildup
How can you spot the earliest signs of water heater failure before they become expensive disasters? Start by monitoring for pooling water around your unit’s base, as even small puddles signal immediate attention’s needed.
Don’t ignore moisture buildup on your heater’s surface—it often indicates condensation or leaks from fittings. Inspect the surrounding floor for water rings and stains, which reveal ongoing leaks that’ll cause significant water damage if left unchecked.
Use a moisture meter to check humidity levels around your heater, since elevated readings suggest hidden leaks or water intrusion. Watch for unusual dampness in nearby areas, as this indicates slow leaks that worsen over time.
Detecting leaks early prevents corrosion inside your system and costly repairs. Effective leak detection requires consistent monitoring of these moisture indicators.
Check for Rust and Corrosion on Tank and Fittings
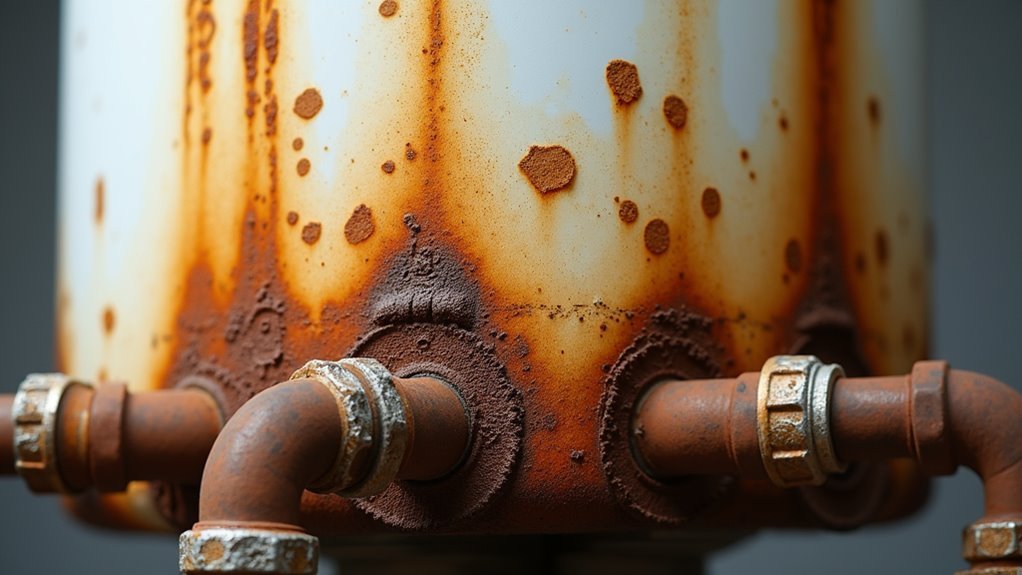
While pooling water signals immediate leaks, rust and corrosion reveal your water heater’s slow deterioration that’ll eventually cause catastrophic failure.
You should regularly inspect your tank and fittings for reddish-brown discoloration or flaking metal around connections. These oxidation signs indicate weakening that leads to future leaks.
Pay special attention to your pressure relief valve and drain valve, where corrosion commonly develops. If you spot rust on the exterior, it often signals internal corrosion, meaning your tank’s nearing replacement time.
Don’t ignore these warning signs. Rust and corrosion progressively weaken metal components until they fail completely.
Contact a professional plumber immediately when you notice deterioration. Early intervention prevents extensive water damage and costly emergency repairs that result from catastrophic tank failure.
Listen for Unusual Sounds From Your Water Heater
Your water heater’s sounds tell a story of its internal condition and potential problems brewing beneath the surface.
Listen for unusual sounds that serve as early warning signals of impending water heater failure. These acoustic clues can help you detect leaks before they cause significant potential damage to your home.
Pay attention to these critical sounds during your leak detection routine:
- Hissing noises – Steam escaping indicates overheating or pressure problems that often lead to leaks.
- Popping or banging sounds – Sediment buildup causing overheating, which can eventually create leaks if ignored.
- Continuous dripping or gurgling – Water escaping through fittings, valves, or pipe connections requiring immediate investigation.
Regular sound monitoring helps you catch problems early, preventing costly repairs and extensive water damage.
Test the Temperature and Pressure Relief Valve
You’ll need to locate your water heater’s Temperature and Pressure Relief (T&P) valve, which typically sits on top or side of the tank with a lever and discharge pipe.
Testing this critical safety component annually guarantees it’ll properly release dangerous pressure buildup and prevent potential tank explosions.
If the valve doesn’t release water when you lift the lever or continues leaking afterward, it’s malfunctioning and requires immediate replacement.
Locate the TPR Valve
Because your water heater’s Temperature and Pressure Relief (TPR) valve serves as a critical safety component, you’ll need to locate it first before testing its functionality.
This valve prevents dangerous pressure buildup that could lead to a leaking water heater or worse complications.
You’ll typically find the TPR valve in these locations:
- Top of the tank – Most common placement, usually connected to a discharge pipe
- Upper side panel – Alternative positioning on some water heater models
- Near the thermostat area – Less common but possible on certain units
Once you’ve identified the valve, you can proceed to test this valve as part of your regular maintenance task.
If you notice continuous leaking or excessive pressure, seek professional attention immediately to prevent potential safety hazards.
Perform Regular Testing
Testing your TPR valve annually guarantees this essential safety component functions properly when needed most. Regular testing prevents dangerous pressure build-up that could damage your water heater or create hazardous conditions.
To test your Temperature and Pressure Relief valve, lift the lever briefly and watch for hot water discharge. The flow should stop immediately when you release it. Continuous dripping indicates malfunction requiring replacement.
| Testing Step | Expected Result | Warning Signs |
|---|---|---|
| Lift lever | Hot water flows | No water discharge |
| Release lever | Flow stops immediately | Continuous dripping |
| Visual inspection | Clean valve body | Corrosion or rust |
Homeowners should inspect their T&P valve for corrosion during testing. Deterioration compromises safety and increases leak risks, requiring immediate professional attention to prevent costly water heater damage.
Identify Valve Malfunctions
When your T&P valve fails to operate correctly, it creates serious safety hazards that can lead to catastrophic water heater damage.
Identifying valve malfunctions early prevents dangerous pressure buildup and costly water heater leaks throughout your home.
When you test the valve, watch for these critical warning signs:
- No water flow – The valve doesn’t release water when you lift the lever, indicating internal blockage or complete failure.
- Continuous leakage – Water keeps flowing after releasing the lever, showing the valve can’t seal properly.
- Water pooling – Puddles around the valve base suggest ongoing malfunction even without testing.
If you notice constant dripping sounds or discover water pooling near your water heater, contact professional plumbing services immediately.
These symptoms indicate your T&P valve requires replacement to prevent potential tank rupture.
Examine Water Quality Changes and Discoloration
How can you tell if your water heater’s developing internal problems before they become major leaks?
Start by monitoring your water quality closely. When you notice rusty or yellow discoloration in your hot water, it’s often indicating corrosion inside your water heater tank. This visual change serves as an early warning system for potential leaks.
Pay attention to taste and smell changes too. A metallic taste or unusual odors can signal sediment buildup or bacterial growth from small leaks. If you spot rust particles consistently appearing in your water, schedule an immediate inspection—this suggests internal corrosion that could lead to tank failure.
Temperature fluctuations, like unexpectedly lukewarm water, may also indicate your heater’s developing problems.
Effective leak detection starts with recognizing these quality changes before visible water damage occurs.
Track Unexpected Increases in Utility Bills
You’ll want to monitor your monthly water bills closely, as unexpected spikes of 10% or more often signal hidden leaks in your water heater system.
Calculate the percentage increase between current and previous months to identify unusual consumption patterns that don’t match your actual usage.
Compare your recent bills against historical data from the same period in previous years to spot trends that indicate potential water heater problems.
Monitor Monthly Bill Patterns
Why does your water bill suddenly jump when your usage habits haven’t changed? Hidden water heater leaks often announce themselves through unexpected increases in utility costs before you notice physical signs.
To monitor monthly bill patterns effectively, you’ll need to establish baseline usage and watch for anomalies.
Here’s how to detect water heater leak warning signs through bill monitoring:
- Track percentage increases – A 10-15% spike above your average signals potential leaks requiring immediate inspection of your water heater.
- Establish usage baselines – Review several months of bills to identify your typical consumption patterns.
- Investigate consistent upward trends – Rising costs without increased usage often indicate hidden plumbing system problems.
Regular bill analysis helps catch leaks early, preventing costly damage and reducing unnecessary utility costs.
Calculate Water Usage Spikes
Three simple calculations can transform your water bill from a monthly expense into a powerful leak detection tool.
First, calculate your percentage increase by dividing this month’s usage by last month’s, then multiply by 100. A spike of 10% or more signals potential water heater leak issues.
Second, compare your current usage against the same period last year to detect seasonal anomalies.
Third, monitor your daily average by dividing monthly usage by 30 days, then track weekly variations.
These calculations help you recognize early signs of water supply problems before they escalate.
When you detect unusual patterns, immediately inspect your water heater and plumbing connections.
Consistent mathematical analysis turns basic utility data into an effective leak detection system.
Compare Historical Consumption Data
When did you last examine your water bills from the past twelve months side by side?
Historical tracking reveals patterns that help you detect water heater leaks through consumption data analysis. By comparing monthly usage, you’ll spot unexpected increases that signal potential problems.
Smart water meters and tracking apps enhance your ability to monitor consumption data in real-time.
Here’s how to effectively analyze your historical water bills:
- Calculate monthly averages – Establish baseline consumption patterns by averaging usage across similar seasonal periods.
- Flag significant spikes – Mark any month showing 10% or more increase compared to previous months as potential leak indicators.
- Document seasonal variations – Record normal fluctuations to distinguish between typical usage changes and water heater leaks requiring immediate attention.
Install Smart Leak Detection Sensors
While traditional water leak detection relies on visual inspection and manual monitoring, smart leak detection sensors transform your water heater protection into an automated early warning system. These devices detect even minimal water amounts, sending instant smartphone notifications to prevent water damage before it escalates.
| Feature | Benefit |
|---|---|
| Early Warning System | Detects leaks before significant damage occurs |
| Smartphone Alerts | Instant notifications for immediate action |
| Temperature Monitoring | Identifies potential issues before leaks develop |
| Easy Installation | Simple setup near water heater and appliances |
Installation around your water heater provides extensive coverage, while advanced models monitor temperature and humidity changes. Studies show homes with these systems reduce the risk of water damage by up to 90%, making them invaluable investments for proactive homeowners.
Inspect Drain Valve and Connection Points
You’ll need to regularly examine your water heater’s drain valve and all connection points to verify potential leaks before they become major problems.
Start by visually inspecting the drain valve for cracks, rust, or any signs of wear that could compromise its integrity.
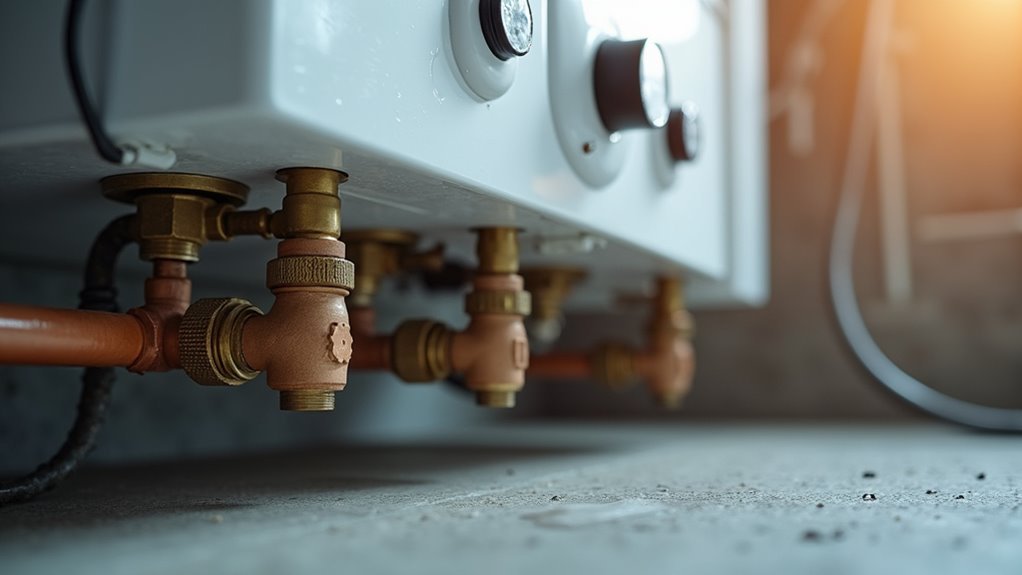
Check all inlet and outlet pipe connections to ascertain they’re secure and free from corrosion, as these areas are common leak sources.
Drain Valve Inspection
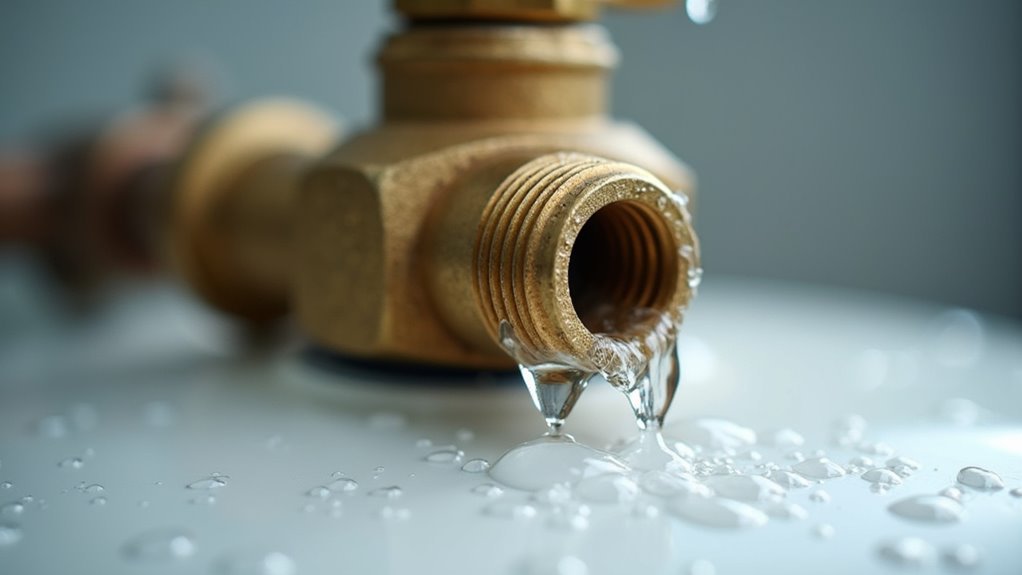
The drain valve at the bottom of your water heater serves as a critical inspection point that’s often overlooked but can reveal early signs of potential problems.
During your inspection, examine the area around the drain valve for water pooling or dampness, which indicates active leaking. Check that connections are tight and secure to prevent future issues.
Key signs to watch for during drain valve inspection:
- Corrosion or rust buildup around the valve body, indicating deterioration that could lead to failure
- Continuous dripping from the valve itself, suggesting internal wear requiring immediate replacement
- Loose fittings at connection points that may cause gradual leaking over time
Test the valve periodically by opening it briefly. If it won’t close properly or continues leaking afterward, replace it immediately to prevent costly water damage.
Connection Point Assessment
Beyond examining the drain valve itself, you need to expand your inspection to include all connection points where pipes attach to your water heater tank. Carefully inspect inlet and outlet pipes for corrosion, rust, or loose fittings that can trigger leaks. Look for water stains or moisture around these areas, as they’re early warning signs requiring immediate attention.
| Connection Point | Warning Signs | Action Required |
|---|---|---|
| Inlet pipes | Rust, corrosion, loose fittings | Tighten or replace |
| Outlet pipes | Water stains, mineral deposits | Seal or repair |
| T&P valve | Dripping, moisture buildup | Test and replace if faulty |
| Tank connections | Visible leaks, wet spots | Immediate professional repair |
| Pipe joints | Corrosion, deterioration | Preventive maintenance |
Regular connection point assessment helps prevent extensive water damage and maintains your water heater’s efficiency.
Leak Prevention Maintenance
Five essential maintenance steps can prevent costly water heater leaks before they cause significant damage to your home.
Effective leak prevention starts with systematic inspection of your water heater’s most vulnerable components.
Regular maintenance protects your investment and prevents emergency repairs.
Focus on these critical areas during your routine checks:
- Drain Valve Monitoring – Inspect for slow drips that signal wear and potential failure requiring immediate replacement.
- Connection Tightening – Use a wrench to secure inlet and outlet pipe connections, as vibration and temperature changes gradually loosen fittings.
- Corrosion Detection – Check all connections for visible rust that weakens fitting integrity and increases leak risk.
Schedule annual professional inspections to thoroughly assess drain valve functionality and connection point stability before minor issues escalate into major flooding problems.
Set Up Automated Monitoring Systems
Smart water sensors revolutionize how you’ll catch leaks before they cause major damage. Automated monitoring systems use moisture sensors strategically placed near your water heater to provide instant leak detection.
When water’s detected, you’ll receive alerts directly on your smartphone or email, enabling immediate action. Advanced systems monitor temperature and pressure levels, identifying irregularities that signal potential failures before they occur.
The best feature? Some automatically shut off your water supply when leaks are detected, helping prevent extensive flooding that could devastate your home.
Don’t install these systems and forget them. Regular maintenance guarantees reliable performance over time. Test sensors monthly, replace batteries annually, and keep software updated.
This proactive approach transforms leak detection from reactive damage control into preventive protection.
Frequently Asked Questions
How Can I Tell Where My Water Heater Is Leaking From?
Check your water heater’s base for pooling water, inspect the T&P valve for dripping, examine inlet/outlet connections for moisture, listen for hissing sounds, and look for rust or corrosion on the tank’s exterior.
How Do You Find Out Where a Water Leak Is Coming From?
You’ll start by checking visible pipes and fixtures for drips or wet spots. Listen for running water sounds, examine water meter readings, and look for water stains on walls, ceilings, or floors.
What Is the Most Common Cause of a Water Heater Leak?
Corrosion is the most common cause you’ll encounter with water heater leaks. It happens when your tank’s material breaks down over time, especially if your unit’s older than 10-15 years.
Are Water Heater Wraps Worth It?
You’ll find water heater wraps worthwhile since they reduce energy costs by up to 9%, prevent condensation issues, and cost only $20-$50 while extending your unit’s lifespan through better insulation.


Leave a Reply