
You’ve probably been putting off installing that smart doorbell camera sitting in its box for weeks, thinking it’ll take hours of complicated wiring and technical setup. The truth is, most homeowners can complete this upgrade in under thirty minutes with basic tools you already own. Before you assume you’ll need an electrician or struggle through confusing instructions, there’s a straightforward approach that’ll have your new security system operational faster than you expect.
Gather Your Tools and Materials
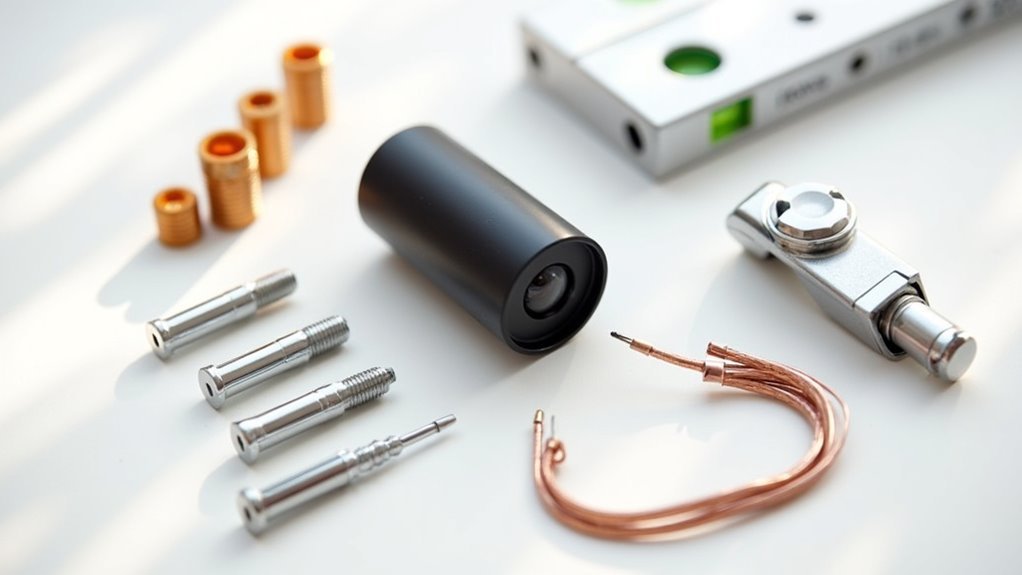
Before you begin installing your smart doorbell camera, you’ll need to gather the essential tools and materials for a smooth setup process. Make certain you have a screwdriver, drill, and level readily available.
Your doorbell kit should include wires, chime kit, extension cables, USB, and mounting accessories.
Check compatibility with your existing doorbell system by identifying whether you have a mechanical or electrical chime. Keep silicone or wall patching materials handy to cover holes from your previous doorbell installation.
Download the manufacturer’s app on your phone before starting installation. This preparation step involves three different phases: tool collection, material verification, and digital setup.
Having everything organized beforehand prevents interruptions during installation and guarantees you can complete the project efficiently without multiple trips to gather forgotten items.
Remove the Existing Doorbell
With your tools and materials ready, you’ll now remove your current doorbell to make way for the new smart camera model. Start by carefully removing the old doorbell unit from its mounting position. You’ll need to make note of any screw holes that may require patching if your new doorbell has a different orientation.
| Task | Time Required |
|---|---|
| Remove old doorbell | 5 minutes |
| Extract wires safely | 3 minutes |
| Patch screw holes | 10 minutes |
| Clean mounting surface | 2 minutes |
| Prepare wire connections | 5 minutes |
Gently pull out the two existing wires—typically black and red—being careful not to lose them inside the wall. This entire removal process takes less than an hour and sets you up for a smooth installation.
Identify and Prepare the Wiring
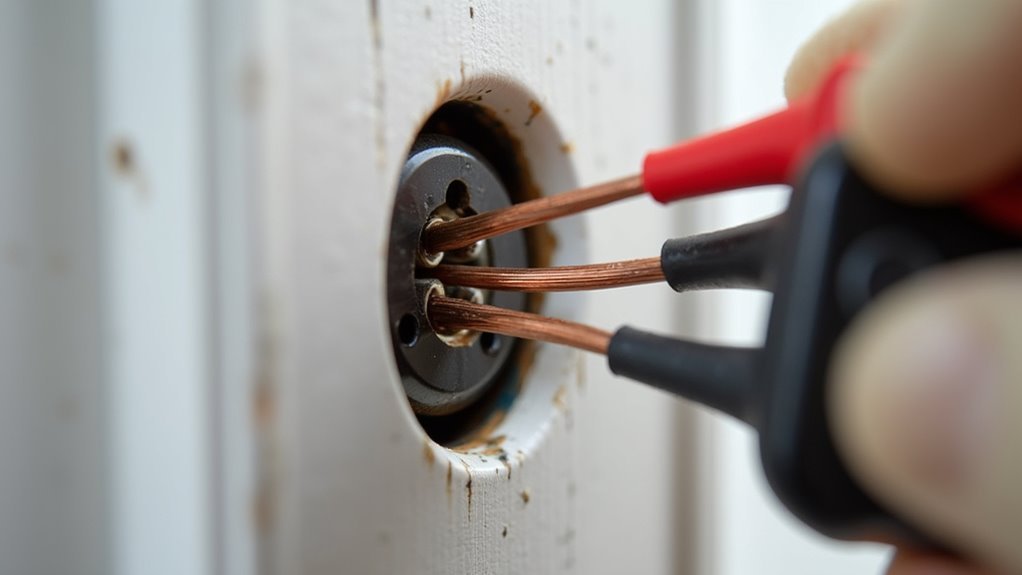
Two cables emerge from your wall where the old doorbell was mounted—typically one black and one red wire that carry the low-voltage power from your home’s transformer.
Gently pull these cables out of the wall to prevent them from falling back inside, ensuring you’ll have easy access when connecting your new smart doorbell.
Use your old doorbell’s screw position to mark the first hole for proper alignment of your new mounting bracket.
Use the existing screw holes as your guide to ensure perfect alignment when mounting your new smart doorbell bracket.
Route both cables through the designated holes in your smart doorbell’s mounting plate—this step is essential for achieving a clean, professional installation.
Confirm your new doorbell supports interchangeable wire connections, giving you flexibility during the wiring process.
Patch Previous Mounting Holes
You’ll need to fill any screw holes left from your old doorbell to create a clean surface for your new smart doorbell camera.
Use wall filler or spackling compound to fill the holes, then smooth them flush with the surrounding wall surface.
Apply silicone sealant around the edges if needed to prevent moisture infiltration and guarantee a professional-looking installation.
Fill Screw Holes
Before mounting your new smart doorbell, you’ll need to address any holes left behind from the previous installation. Use silicone or a suitable wall patching compound to fill these screw holes completely. This step prevents moisture intrusion and creates a clean, professional appearance for your new device.
Apply the patching material generously, then smooth it out with a putty knife to create an even finish that blends seamlessly with the surrounding wall surface.
Allow the patch to fully dry according to the manufacturer’s instructions—rushing this step will compromise your results.
Once dried, lightly sand the patched area if necessary to guarantee it’s perfectly flush with the wall surface before proceeding with your smart doorbell installation.
Apply Silicone Sealant
With your patched holes properly dried and sanded, grab your caulking gun and load it with high-quality silicone sealant designed for exterior use. Clean all debris from the old screw holes first to guarantee better adhesion. Apply the sealant evenly around each hole, filling them completely to prevent moisture infiltration.
| Step | Action | Timeline |
|---|---|---|
| 1 | Clean old screw holes of debris | 5 minutes |
| 2 | Apply sealant with caulking gun | 10 minutes |
| 3 | Smooth with wet finger or tool | 5 minutes |
| 4 | Allow full cure time | 24 hours |
Smooth the silicone with a wet finger or specialized tool for a neat finish. Remove excess sealant immediately to maintain a tidy appearance. Let it cure for 24 hours before installing your new doorbell.
Select the Right Mounting Plate
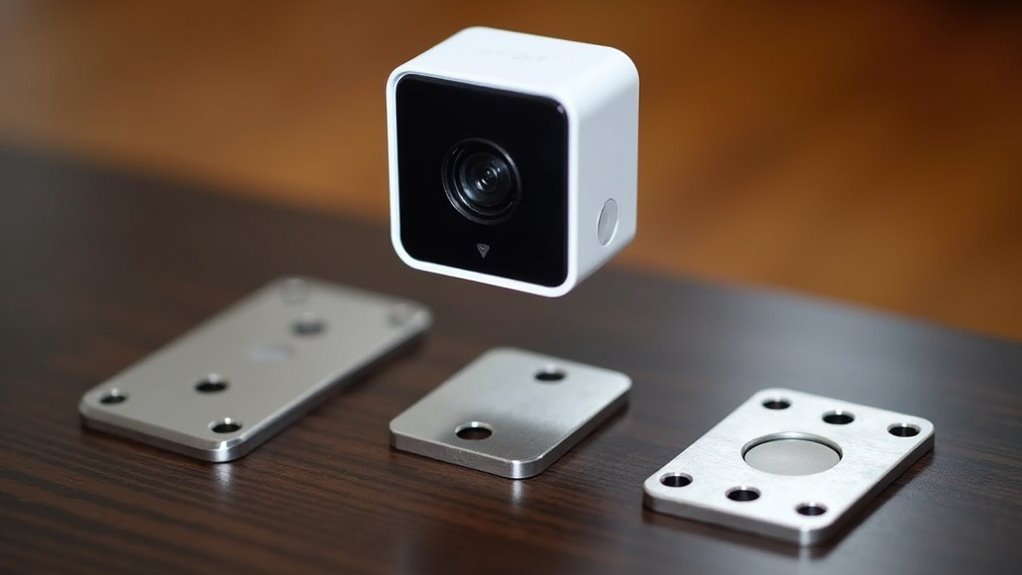
Since smart doorbell cameras require precise positioning to capture clear footage of visitors and packages, selecting the appropriate mounting plate from your kit becomes essential for maximum performance.
Your new doorbell kit includes three different mounting plates designed to accommodate various angle adjustments for ideal camera positioning.
Take time to evaluate your installation surface and determine the desired angle before choosing your plate. Each plate offers different positioning capabilities to guarantee your camera captures the best view of your entryway.
Once you’ve selected the appropriate mounting plate, use your old screw to mark the first hole for accurate placement and minimize patchwork.
Proper alignment of the mounting bracket guarantees your doorbell installs securely and functions effectively for years to come.
Mark and Drill New Holes
Position your old doorbell against the mounting plate to mark the first screw hole, ensuring proper alignment between the existing hardware and your new bracket. This reference point helps maintain consistent positioning and prevents installation errors.
Before drilling, patch any visible screw holes from your previous doorbell using wood filler or spackling compound. This creates a clean, professional-looking surface for your new installation.
Mark all drilling locations using a pencil, then verify they’re level with a small bubble level. Most smart doorbell mounting plates offer multiple hole options for different installation angles, so choose positions that provide the best viewing angle for your specific needs.
Drill pilot holes at your marked locations, ensuring you’re drilling straight and at the appropriate depth for your chosen screws.
Route Cables Through the Mounting Bracket
Carefully pull the existing doorbell wires out from the wall opening, keeping them accessible while you prepare the mounting bracket. Gently handle the cables to avoid losing them inside the wall cavity.
Position the mounting bracket against the wall, aligning it with the existing screw hole from your old doorbell to mark your first installation point.
Thread the black and red wires through the designated opening in the mounting bracket, ensuring they’re routed properly for easy access.
Make sure the cables are positioned securely and won’t interfere with the bracket’s placement against the wall surface. Double-check that both wires have sufficient length extending through the bracket before proceeding with the final installation steps.
Connect the Doorbell Wires
With the mounting bracket properly positioned and wires threaded through, you’ll now make the electrical connections that power your smart doorbell. Start by gently pulling the cables from the wall to prevent them from retracting inside. The red and black wires are interchangeable, so don’t worry about specific connection order.
| Step | Action | Result |
|---|---|---|
| 1 | Connect red/black wires | Flexible order |
| 2 | Secure with two screws | Stable mounting |
| 3 | Check blue light | Power confirmed |
Once you’ve connected the wires, push them back into the wall slots for a clean appearance. Secure your doorbell to the mounting plate using the two provided screws. After installation, verify the blue light indicator appears, confirming proper power supply functionality.
Secure the Smart Doorbell to the Wall
Take your smart doorbell unit and align it with the mounting bracket you’ve already installed on the wall. You’ll want to guarantee perfect alignment before securing everything in place.
Follow these steps to complete the installation:
- Mark the first hole – Use an old screw to mark where you’ll drill the initial mounting hole, guaranteeing proper bracket alignment.
- Route the cables – Thread your doorbell wires through the mounting plate before attaching the unit to the wall.
- Secure with screws – Use two screws to firmly attach the doorbell, remembering that red and black wires connect interchangeably.
- Tidy the installation – Gently push excess wires back into wall slots and apply silicone to seal any holes from your previous doorbell.
Locate and Access Your Chime Box
You’ll need to find your home’s indoor chime box, which produces the sound when someone presses your doorbell.
Once you’ve located it, carefully remove the cover to expose the internal wiring and components.
This will help you identify whether you’re working with a mechanical or electrical chime system and locate the specific wire connections you’ll need for your smart doorbell installation.
Find Indoor Chime Location
Where exactly is your indoor chime box hiding in your home? Most chime boxes are strategically positioned in central locations for maximum sound distribution throughout your house.
You’ll typically find this small rectangular unit mounted on a wall where you can easily hear the doorbell from multiple rooms.
Check these common locations:
- Near the front door entrance – Usually within 10-15 feet on an interior wall
- Central hallway areas – Where sound travels effectively to living spaces
- Kitchen or dining room walls – High-traffic areas where you’re likely to hear it
- Utility closets or mudrooms – Sometimes tucked away but still accessible
Once you’ve spotted the chime box, you’ll notice it’s a compact unit with a removable cover that houses the internal wiring and chime mechanism.
Remove Chime Cover Safely
Before touching anything, shut off the power to your doorbell circuit at the breaker box to eliminate any risk of electrical shock.
Once you’ve confirmed the power is off, examine your chime cover to determine how it’s attached. You’ll typically find screws holding it in place or clips that allow you to gently pry it off.
Use a screwdriver to remove any visible screws, or carefully work around the edges with a flat tool if it’s clipped on.
With the cover removed, you’ll see the internal components of your chime system. Look for mechanical parts like springs if you have a traditional chime.
Most importantly, locate the front and trans wires—these are essential connections you’ll need for your smart doorbell installation.
Identify Wire Connection Types
With the chime cover removed, examine the wiring configuration to determine what type of connections you’re working with.
Look inside the chime box to identify your system type and locate the essential wires for your smart doorbell installation.
Here’s what you’ll need to identify:
- Front and trans wires – These are the primary connections your smart doorbell requires to function properly.
- Mechanical components – Springs and moving parts indicate a traditional mechanical chime system.
- Circuit board presence – Electronic components signal you have an electrical chime system.
- Wire gauge and condition – Check that existing wiring can handle your new doorbell’s power requirements.
Use a multimeter to test voltage on the wires if you’re uncertain about compatibility.
This step guarantees your new smart doorbell will receive adequate power.
Install the Chime Kit Components
Three key components make up your smart doorbell’s chime system, and you’ll need to install them properly for reliable notification sounds.
Start by locating your indoor chime box, which provides the audio output when someone presses your doorbell. Remove the chime box cover to examine the internal system—you’ll see visible springs if you have mechanical chimes.
Your indoor chime box houses the audio components that create doorbell sounds when visitors press the button at your entrance.
Next, identify the front and trans wires inside the chime box. These specific wires handle the connection between your smart doorbell and the chime system. Connect your chime kit to these designated wires following the manufacturer’s instructions.
After completing the electrical connections, place the chime kit components neatly inside the cover. This maintains a clean, organized appearance while ensuring proper functionality and ideal sound performance from your smart doorbell system.
Download and Set Up the Mobile App
Once you’ve completed the hardware installation, you’ll need to download the dedicated mobile app to control your smart doorbell camera.
Search for your device’s specific app in the App Store or Google Play and install it on your smartphone.
The setup process involves these essential steps:
- Create your account – Register with your email or log into an existing account to access all camera features.
- Connect to Wi-Fi – Follow the in-app prompts to link your doorbell to your home network for remote access.
- Enable notifications – Turn on alerts in settings to receive motion detection and visitor notifications instantly.
- Explore features – Test video recording, two-way audio messaging, and other security functions to maximize your doorbell’s capabilities.
Configure Notifications and Recording Settings
After you’ve downloaded the app and connected your smart doorbell to Wi-Fi, you’ll need to configure how it communicates with you.
The app’s notification settings let you customize alerts for motion detection, doorbell presses, and other activities based on your preferences.
You can also enable cloud recording features to automatically save video footage for later review, with various storage duration options available.
App Download Setup
While your smart doorbell camera’s physical installation provides the foundation, downloading and configuring the dedicated mobile app activates the device’s full potential.
You’ll need to complete the initial setup to access features like motion detection, visitor alerts, and remote communication capabilities.
Follow these essential app setup steps:
- Download the manufacturer’s app from your device’s app store and create your personalized account
- Configure recording preferences by selecting continuous, motion-triggered, or scheduled recording modes
- Enable audio messaging features to communicate with visitors remotely through your smartphone
- Explore advanced integrations including video history access, real-time notifications, and smart home device connectivity
This configuration transforms your doorbell camera from a basic recording device into a thorough home security solution.
Notification Alert Options
With your app successfully configured, you can now fine-tune your doorbell camera’s notification and recording settings to match your specific security needs.
Navigate to the notification preferences section where you’ll customize alerts for motion detection, doorbell presses, and specific activity zones. This targeted approach prevents unnecessary notifications while ensuring you’re alerted to important events.
Enable cloud storage options to save recorded footage and access it remotely from anywhere.
Configure the audio message feature to communicate directly with visitors through your doorbell camera, providing convenience and security.
Set recording duration, quality settings, and storage preferences based on your requirements.
Regularly review and update these notification settings to optimize your doorbell camera’s performance and responsiveness as your security needs evolve.
Test Your New Smart Doorbell System
Once you’ve completed the installation, three essential tests will verify your smart doorbell camera functions correctly.
Start by checking the power indicator—you should see a blue light confirming the device is connected and operational.
Next, download your system’s app to configure settings and access all camera features.
Run these critical tests to guarantee everything works properly:
- Press the doorbell button and listen for the indoor chime to sound, confirming the connection between your doorbell and chime system.
- Open the app and view the live video feed to verify it captures your desired coverage area.
- Trigger the motion sensor and check the recorded footage in the app.
- Test notification alerts by walking in front of the camera.
Your smart doorbell system is now ready for daily use.
Frequently Asked Questions
How Long Does It Take to Install a Wireless Ring Doorbell?
You’ll typically complete a wireless Ring doorbell installation in under an hour. You’ll remove your old doorbell, patch holes, connect wiring, and configure the Ring app. The blue light confirms you’ve successfully connected power.
How Hard Is It to Install a Doorbell Camera?
Installing a doorbell camera isn’t hard at all. You’ll simply remove your old doorbell, connect the wires, and secure the new device with screws. The adjustable mounting bracket makes alignment easy for any door.
Are Smart Doorbells Easy to Install?
You’ll find smart doorbells surprisingly easy to install. They include thorough kits with mounting plates and screws. You can connect wires in any order, and you’ll typically finish everything within an hour using the mobile app.
How Do I Set up My Smart Wi-Fi Doorbell Camera?
You’ll connect the red and black wires to your doorbell, mount the bracket securely, install the indoor chime box, then download the app to configure notifications, recording settings, and customize audio messages.


Leave a Reply