You’re probably paying far more than necessary for motion sensor installation when you could tackle this project yourself in less than an hour. While professional installation fees can easily reach $300, the actual complexity of mounting and wiring these devices is surprisingly minimal. Most homeowners discover they’ve been overestimating the technical skills required, but there’s more to contemplate before you grab your toolkit and head to the hardware store.
Understanding Budget Motion Sensor Options

When you’re shopping for budget motion sensors, you’ll find that most rely on Passive Infrared (PIR) technology, which detects heat changes from moving objects like intruders. This technology makes these sensors both cost-effective and energy-efficient, perfect for residential security needs.
You’ll discover that budget motion sensors offer adjustable sensitivity settings, letting you reduce false alarms from pets or weather conditions. Most models provide coverage ranges between 20 and 50 feet, which adequately protects typical residential properties without requiring expensive alternatives.
These affordable options feature wireless connectivity and simple mounting systems, making DIY installation straightforward for homeowners. You won’t need professional help to set them up.
Budget motion sensors offer effortless DIY installation with wireless connectivity and simple mounting, eliminating the need for professional installation costs.
When selecting budget motion sensors, verify they’re compatible with your existing smart home systems for seamless integration and enhanced security functionality.
Cost Savings Compared to Professional Installation
When you choose DIY installation for budget motion sensors, you’ll immediately avoid the $100 to $300 in professional labor costs that can eat up to 60% of your total security investment.
You can redirect those savings toward purchasing higher-quality sensors or expanding your system with additional security features.
This approach delivers both immediate cost relief and long-term financial benefits by maximizing your security budget’s effectiveness.
Professional Installation Costs
While professional installation services provide expertise and warranty coverage, they’ll significantly increase your motion sensor project costs. Professional installation costs typically range from $100 to $300 per sensor, depending on complexity and your area’s labor rates. You’ll also face additional charges for site assessments and consultations that professionals routinely require.
| Cost Component | Professional Installation | DIY Installation |
|---|---|---|
| Labor per sensor | $100-$300 | $0 |
| Site assessment | $50-$150 | $0 |
| Total for 3 sensors | $450-$1,350 | $150-$300 |
DIY installation eliminates these expenses entirely, saving you up to 50% of total project costs. Most motion sensors are designed for straightforward self-installation, requiring only basic tools and minimal technical skills. You’ll complete installation in under an hour while avoiding professional scheduling delays.
DIY Equipment Savings
Beyond eliminating labor fees, DIY motion sensor installation delivers substantial equipment savings that professional services rarely mention.
When you’re installing motion sensors yourself, you’ll avoid marked-up equipment costs that technicians typically charge. Professional installers often bundle expensive units with their services, while you can purchase quality budget motion sensors ranging from $20 to $100 directly.
Your DIY equipment savings extend beyond initial purchases. You won’t pay for unnecessary add-ons or premium models that professionals might recommend.
Most budget motion sensors feature plug-and-play designs, requiring only basic tools you likely already own. By selecting your own equipment and installing motion sensors independently, you’ll save hundreds while achieving the same security results as expensive professional installations.
Long-Term Financial Benefits
These immediate savings represent just the beginning of your financial benefits from DIY motion sensor installation.
You’ll experience long-term energy savings of 50-75% on your lighting costs since motion sensors activate only when movement’s detected. This translates to substantially reduced electricity bills month after month, year after year.
Your budget motion sensors, costing just $20-50 each, continue delivering value without ongoing maintenance fees that professional services often charge.
You can expand your security system gradually, adding sensors to multiple rooms for the price of one professional installation.
The cumulative effect means you’re not only protecting your home more thoroughly but also maximizing energy efficiency throughout your entire property while maintaining complete control over your investment.
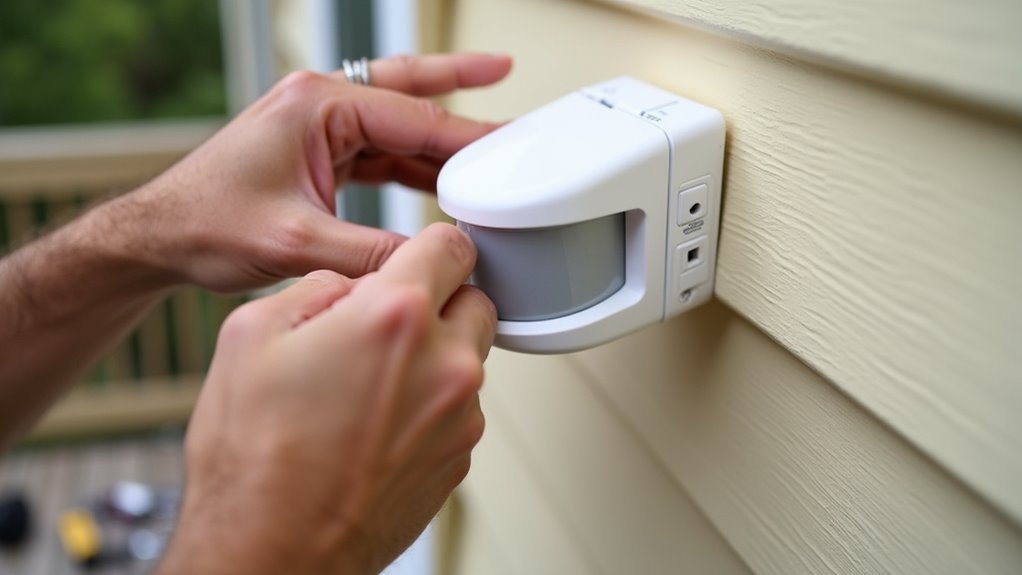
Essential Tools and Materials for DIY Installation
You’ll need several basic installation tools to successfully mount your budget motion sensors, including a drill, screwdriver, level, and measuring tape for accurate placement.
The required mounting hardware varies by location, with outdoor installations demanding weather-resistant screws and anchors to guarantee long-term durability.
Don’t forget essential electrical safety equipment, especially if you’re working with wired sensors that require proper handling of electrical connections.
Basic Installation Tools
A handful of essential tools can make the difference between a smooth motion sensor installation and a frustrating DIY project.
You’ll need basic installation tools including a drill, screwdriver, and measuring tape for precise placement and secure mounting. Don’t forget screws and anchors that match your wall type – this guarantees your sensor stays put and functions properly.
A level tool is vital for accurate alignment, preventing malfunctions caused by improper positioning. Keep fresh batteries handy for battery-operated sensors to avoid immediate operational failures after installation.
You’ll also need a ladder for reaching ideal mounting heights, typically 6-8 feet off the ground for wall-mounted sensors. Having these tools ready beforehand streamlines your installation process considerably.
Required Mounting Hardware
Proper mounting hardware forms the backbone of any successful motion sensor installation. Most motion sensors include mounting hardware like screws and anchors in their packaging, but you’ll want to verify what’s provided before starting your project.
You might need additional items like a stud finder to locate the best mounting points on your walls, guaranteeing your sensor stays securely in place.
For ideal results during the installation process, consider the surface you’re mounting to. Drywall requires different anchors than concrete or wood surfaces. If you’re mounting on exterior walls or areas with heavy vibration, upgrading to heavy-duty mounting hardware guarantees long-term stability.
Having backup screws and anchors on hand prevents project delays if you encounter unexpected installation challenges.
Electrical Safety Equipment
When working with motion sensors that require electrical connections, safety equipment becomes your first line of defense against potential hazards.
You’ll need proper electrical safety equipment to protect yourself throughout the installation process.
Essential protective gear includes:
- Voltage tester – Confirms power is off before starting work
- Insulated tools – Minimizes electrical shock risk when handling wires
- Safety glasses – Protects eyes from debris and sharp edges
- Work gloves – Guards hands against cuts and electrical contact
Always test circuits with your voltage tester before touching any wires.
Your insulated tools should include screwdrivers and wire strippers specifically designed for electrical work.
Don’t skip safety glasses, especially during outdoor installations where mounting surfaces may create flying debris.
Keep a utility knife handy for cutting packaging and electrical tape safely.
Safety Considerations Before Starting Your Project
Before you begin installing your budget motion sensors, prioritizing safety will protect you from preventable accidents and guarantee a smooth installation process. Turn off electricity at the circuit breaker before starting any electrical work to prevent shock. Wear appropriate safety gear including gloves and goggles when handling tools and equipment.
| Safety Step | Action Required |
|---|---|
| Electrical | Turn off circuit breaker |
| Personal Protection | Wear gloves and safety goggles |
| Ladder Usage | Verify stable, level placement |
| Location Planning | Avoid high-traffic areas |
| Manual Review | Read device-specific instructions |
When using ladders, verify they’re stable on level ground with someone assisting you. Choose installation locations away from high foot traffic areas to prevent damage. Always review your specific motion sensor’s manual for unique safety and security requirements before beginning installation.
Choosing the Right Location for Maximum Effectiveness
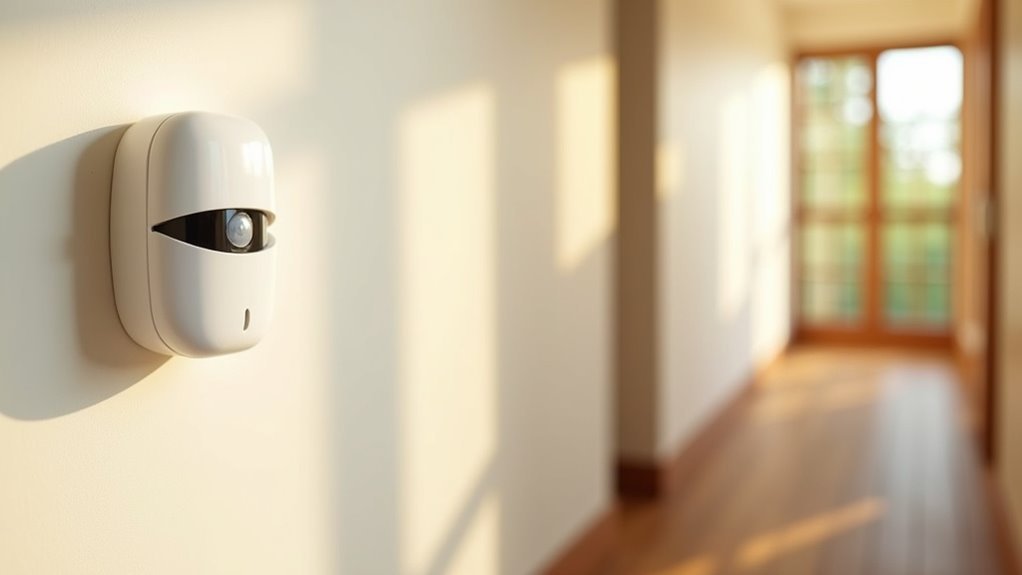
You’ll maximize your motion sensor’s effectiveness by carefully selecting where and how you position it in your home.
The right height and angle guarantee proper detection while minimizing unwanted triggers from pets or environmental factors.
Smart coverage planning helps you monitor key areas without creating blind spots or overlapping zones that waste your budget.
Optimal Height and Angle
Three critical factors determine your motion sensor’s effectiveness: height, angle, and strategic placement.
Mount your PIR sensors at the ideal height of 6-8 feet to detect human infrared signatures while avoiding false triggers from pets. When you angle the sensors slightly downward, you’ll capture approaching movement more accurately and expand your detection zone.
Follow these positioning guidelines for maximum coverage:
- Install sensors in room corners or hallway intersections for broader detection areas.
- Align the field of view with high-traffic zones and entry points.
- Avoid placement near heat sources or direct sunlight exposure.
- Position sensors to eliminate blind spots around doors and windows.
Proper height and angling transforms basic budget sensors into reliable security components that effectively monitor your property.
Coverage Area Planning
Beyond proper mounting techniques, strategic coverage area planning determines whether your motion sensors create an impenetrable security network or leave dangerous gaps in protection.
You’ll want to prioritize entry points like doors and windows where intruders typically access homes. Position sensors in high-traffic areas such as hallways and staircases to detect movement throughout your living space effectively.
Install sensors in room corners to maximize their field of view and detection range. Don’t overlook less frequently monitored spaces like basements and attics, where additional sensors strengthen your security coverage.
Assess your home’s specific layout to identify potential blind spots. This systematic approach guarantees your budget motion sensors work together seamlessly, creating thorough protection that rivals expensive professional installations.
Avoiding False Alarm Triggers
While proper coverage planning forms the foundation of effective motion detection, poor sensor placement often sabotages even the most thorough security system through persistent false alarms.
Strategic positioning of your motion sensors directly impacts their reliability and effectiveness.
When avoiding false alarms, follow these critical placement guidelines:
- Position sensors away from direct sunlight and heat sources that cause temperature fluctuations.
- Install PIR sensors 6-8 feet high to detect human movement while minimizing small animal triggers.
- Avoid areas with heavy foliage or wind-blown objects that create unnecessary movement.
- Maintain clear fields of view without obstructions that block sensor detection.
Keep sensors within their ideal 6.5 to 70-foot detection range for reliable activation.
These placement strategies guarantee your budget security system delivers consistent performance without nuisance alerts.
Step-by-Step Wiring and Mounting Process
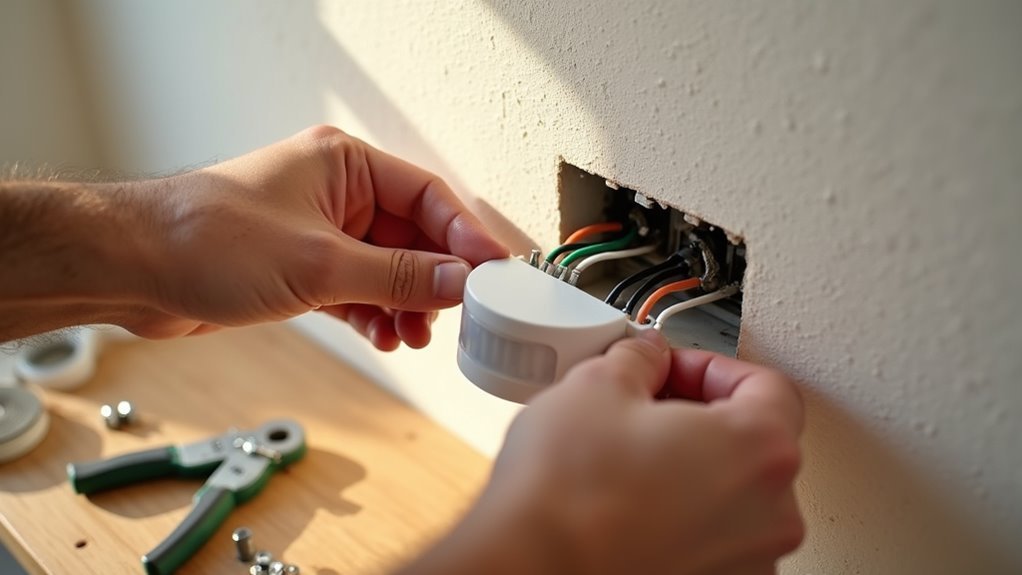
Prepare for your motion sensor installation by gathering the necessary tools: a drill with appropriate bits, wire strippers, electrical tape, a voltage tester, and a screwdriver. Start by turning off power at the circuit breaker for safety. Understanding how motion sensors work helps guarantee proper installation positioning at 6-8 feet height for ideal detection range.
| Step | Action |
|---|---|
| 1 | Turn off power and verify with voltage tester |
| 2 | Drill mounting holes and secure sensor bracket |
| 3 | Connect wires following color coding (black-live, white-neutral, green-ground) |
| 4 | Adjust detection range and sensitivity settings |
Complete your step-by-step wiring by securing all connections with electrical tape. Replace the sensor cover, restore power at the breaker, and test functionality by walking through the detection zone.
Configuring Sensitivity and Detection Range Settings
After completing the physical installation, you’ll need to configure your motion sensor’s detection settings to match your specific security requirements.
Start by adjusting the detection range between 6.5 to 70 feet based on your property’s layout, then fine-tune the sensitivity levels to filter out unwanted triggers from pets or passing vehicles.
These adjustments are essential for minimizing false alarms while ensuring your sensor reliably detects genuine security threats.
Adjusting Detection Range
Once you’ve installed your budget motion sensor, you’ll need to fine-tune its detection range and sensitivity settings to match your specific environment.
Adjusting detection range is essential for peak performance, as most sensors offer coverage between 6.5 to 70 feet depending on your model.
Here’s how to enhance your detection range:
- Start with medium range settings and test in your specific location
- Consider sensor placement – closer positioning requires shorter range to prevent over-triggering
- Account for room size and adjust accordingly to avoid dead zones
- Test with actual movement patterns in the space
Proper range configuration helps reduce false alarms while ensuring reliable detection.
Most sensors feature simple dials or digital interfaces, making adjustments quick and straightforward for your needs.
Fine-Tuning Sensitivity Levels
Beyond setting your detection range, sensitivity levels require equal attention to prevent your motion sensor from triggering unnecessarily.
You’ll want to adjust these settings to detect movement from people while ignoring pets, wind, or moving branches. Most budget sensors offer sensitivity controls that let you customize detection based on your specific environment.
Consider using dual sensitivity settings if your sensor supports them – higher sensitivity during nighttime hours and lower levels during the day when environmental factors cause more disturbances.
Start with medium sensitivity and gradually fine-tune based on performance. If you’re getting false alarms from small animals, reduce the sensitivity until it only responds to significant human movement.
Regular adjustments help maintain peak effectiveness as conditions change.
Minimizing False Alarms
While proper sensitivity adjustment forms the foundation of effective motion detection, you’ll need to combine it with strategic detection range configuration to truly minimize false alarms.
Adjusting the sensitivity settings allows your sensors to distinguish between human movement and smaller disruptions like pets or wind-blown foliage.
Configure your detection range between 6.5 to 70 feet based on your specific monitoring needs:
- Set narrower ranges for indoor spaces to avoid distant triggers
- Use pet immunity features for households with animals under certain weights
- Consider dual-technology systems combining PIR and microwave detection
- Regularly test and calibrate sensors after initial installation
This thorough approach to minimizing false alarms guarantees your budget motion sensors provide reliable security without constant nuisance alerts disrupting your daily routine.
Testing Your Motion Sensor After Installation
After completing your motion sensor installation, you’ll need to verify it’s working correctly before relying on it for security.
Start testing your motion sensor by walking in front of it at various distances within its 6.5 to 70-foot range. Adjust sensitivity settings and observe how it responds to both small and large movements to minimize false alarms.
Check the coverage area thoroughly, identifying any blind spots that could compromise your home’s security.
Walk through all entry points and high-traffic areas to guarantee complete monitoring. Conduct nighttime testing to confirm the sensor activates lights properly in dark conditions.
Monitor your motion sensor’s performance over several days, noting any inconsistencies or false triggers that might require recalibration for peak functionality.
Troubleshooting Common Installation Issues
Even when you’ve followed installation instructions carefully, motion sensors can present unexpected challenges that require quick solutions.
When your motion sensor lights fail to detect motion properly, systematic troubleshooting will restore functionality.
Start with these essential checks:
- Height and alignment – Mount PIR sensors 6-8 feet high with proper positioning
- Battery replacement – Check power levels and replace weak batteries immediately
- Sensitivity adjustment – Fine-tune settings to prevent false alarms from pets or wind
- Clear obstructions – Remove furniture, plants, or debris blocking the detection field
If problems persist, consult your sensor’s installation manual for model-specific troubleshooting steps.
Different brands often have unique requirements and solutions that address particular issues you’re experiencing with your setup.
Integrating Budget Sensors With Existing Smart Home Systems
Once you’ve successfully installed your budget motion sensors, integrating them with your existing smart home system transforms basic detection devices into powerful automation tools.
You’ll need to guarantee your sensors support compatible protocols like Zigbee, Z-Wave, or Wi-Fi for seamless connectivity with your current ecosystem. Most budget sensors include mobile apps that let you customize settings and receive smartphone alerts, enhancing both convenience and security.
When integrating motion sensors, you can create customized automation routines that boost your smart home’s effectiveness.
Set lights to activate automatically when motion’s detected, or program climate control to adjust based on occupancy. These automations can reduce your energy bills by up to 75%, making your home more efficient while improving security response times throughout your property.
Maintenance Tips to Extend Sensor Lifespan
While budget motion sensors offer excellent value, proper maintenance guarantees they’ll continue protecting your home for years to come.
These maintenance tips make certain your sensors play their protective role effectively:
- Clean regularly – Wipe the sensor lens and housing with a soft cloth to prevent dust buildup that reduces sensitivity.
- Replace batteries – Change batteries every 6-12 months to maintain consistent functionality during critical moments.
- Test performance – Periodically check detection range and sensitivity, adjusting settings as needed.
- Clear obstructions – Trim foliage or reposition furniture that blocks the sensor’s line of sight.
Follow manufacturer guidelines and adjust settings seasonally.
Temperature changes and weather conditions can affect performance, so reviewing your sensor configuration twice yearly keeps your security system running efficiently without costly repairs or replacements.
When to Call a Professional Vs DIY Solutions
Although budget motion sensors offer straightforward installation, you’ll need to decide whether to tackle the project yourself or hire a professional.
DIY installation works well if you’re comfortable with basic tools and can complete most sensors in under an hour. You’ll save 20-30% on costs by avoiding professional installation fees.
However, call a professional when electrical work’s involved, as improper wiring creates safety hazards.
Complex homes with unique architectural features or multiple entry points benefit from professional expertise to eliminate blind spots you might miss.
Additionally, professional installation becomes essential when integrating sensors with existing security systems or smart home technology, where compatibility and configuration challenges exceed typical standalone setups.
Upgrading and Expanding Your Motion Sensor Network
After establishing your initial motion sensor setup, expanding your network strategically amplifies your home’s security coverage.
Adding motion sensors to high-traffic areas creates thorough protection that dramatically reduces burglary risks. The FBI reports homes with multiple sensors are 300% less likely to be burglarized.
Consider these strategic expansion benefits:
- Cost savings – DIY installation eliminates $100-$300 professional fees per sensor
- Enhanced coverage – Multiple sensors create overlapping security zones
- Customizable settings – Adjust sensitivity for pet-friendly operation without compromising effectiveness
- Smart integration – Connect additional sensors to existing home automation systems for smartphone monitoring
You’ll find budget motion sensors designed for easy installation require only basic tools and minimal expertise, allowing quick network expansion without lengthy delays or technical complications.
Long-term Benefits of Self-Installed Motion Sensors
Beyond the immediate security improvements, self-installed budget motion sensors deliver considerable long-term advantages that continue paying dividends for years.
You’ll slash energy costs by 50-75% since lights activate only when needed, dramatically reducing electricity bills compared to continuously burning bulbs. This energy efficiency translates into meaningful monthly savings.
Your home’s value increases greatly through these enhanced security features and energy-efficient solutions, making your property more attractive to potential buyers.
Self-installed motion sensors give you complete system knowledge, enabling quick troubleshooting and adjustments without expensive service calls.
You’ll maintain flexibility to modify sensor placement as your needs evolve, ensuring ideal coverage remains intact.
These cumulative benefits make DIY installation a smart investment that strengthens both your security and financial position over time.
Frequently Asked Questions
What Are Two Drawbacks of Using Motion Sensors?
You’ll face false alarms from pets, wind, or passing vehicles that create unnecessary disturbances. You’ll also deal with ongoing maintenance requirements like cleaning sensors and checking batteries regularly.
How Much Does It Cost to Install a Motion Sensor?
You’ll spend $20 to $100 for a basic motion sensor, plus $50 to $150 for professional installation. However, you can save up to 50% by installing it yourself.
Why Do We Need Motion Sensors?
You need motion sensors because they’ll boost your home security by 300%, automatically light pathways for safety, slash energy costs by 50-75%, provide hands-free convenience, and integrate seamlessly with smart home systems.
Where Should You Not Place a Motion Sensor?
You shouldn’t place motion sensors facing direct sunlight, near heating vents, air conditioning units, or moving objects like trees. Avoid mounting them too high, too low, or in enclosed spaces where detection’s limited.


Leave a Reply