You’ll need to follow specific steps to successfully install LED lights on your bed frame without damaging the surface or creating electrical hazards. The process involves more than simply sticking strips underneath your mattress support – proper measurement, surface preparation, and electrical connections are essential for a safe, long-lasting installation. Understanding these requirements upfront will save you from costly mistakes and guarantee your lighting project enhances your bedroom’s ambiance effectively.
Benefits of Installing LED Lights on Bed Frames
While traditional bedroom lighting often feels harsh or inadequate, installing LED lights on your bed frame transforms your space into a modern sanctuary with extraordinary versatility.
You’ll enhance your bedroom’s ambiance with aesthetically pleasing illumination that completely transforms your decor.
Your sleep quality improves considerably when you choose warm colors like red or amber from RGB LED options, which stimulate melatonin production and create calming atmospheres.
The LED strip’s customizable features offer dimming options and various color settings, letting you tailor lighting to your mood.
Safety remains paramount since LEDs generate minimal heat, eliminating burn or fire risks near your bed frame.
You’ll appreciate the practical nighttime illumination that doesn’t disrupt sleep, while the reliable power supply guarantees consistent performance throughout the night.
Essential Materials and Tools Required
Now that you understand how LED lights can revolutionize your bedroom’s functionality and atmosphere, you’ll need specific materials and tools to bring this transformation to life.
LED lights can completely transform your bedroom’s ambiance and functionality with the right materials and preparation.
Start by gathering your LED strip lights and choosing between RGB LEDs for color-changing effects or single-color options for subtle ambiance. You’ll need a compatible 12V DC power supply and controller for adjusting colors and brightness.
Essential tools include scissors for cutting the strip to fit your single bed or larger frame, measuring tape for accurate length calculations, and adhesive clips for secure attachment.
Don’t forget a dimmer controller for brightness adjustment, connectors for multiple strips, and duct tape for non-permanent component mounting.
Measuring Your Bed Frame Perimeter
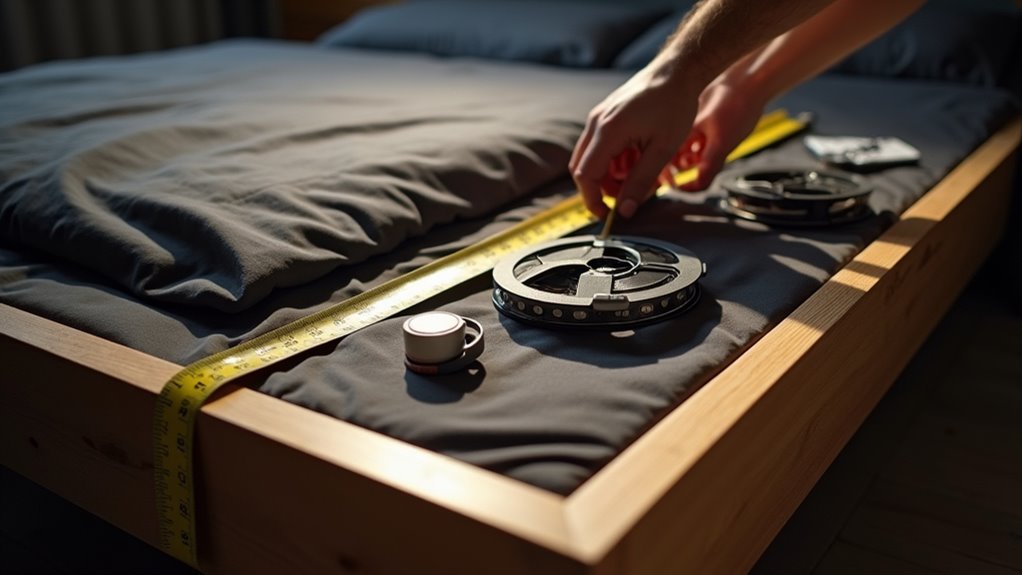
Before purchasing your LED strips, you’ll need to take precise measurements of your bed frame’s perimeter to confirm complete coverage and avoid purchasing excess material.
Use a measuring tape to capture each side’s length, accounting for any overhang or design features that might affect the installation path.
For standard single beds, you’ll typically need approximately 5 meters of LED strip total. Larger beds like queen or king sizes require longer strips, so measure carefully to avoid shortfalls.
When you connect the LED strip around corners, verify you’ve measured those areas precisely.
Round your total measurements to the nearest whole meter for easier purchasing decisions.
Purchase an LED strip that’s slightly longer than your calculated perimeter to provide flexibility during installation and account for any measurement variations.
Selecting the Right LED Strip Length and Type
Once you’ve determined your bed frame’s measurements, you’ll need to select an LED strip that matches both your length requirements and desired features.
For most single beds, you’ll typically need around 5 meters, while larger beds require longer strips. Choose RGB LED strips if you want customizable color options and enhanced versatility.
Look for strips with remote controls to access features like fading and flashing effects. Select strips that can be cut to fit your exact bed dimensions, allowing you to repurpose leftover pieces for other projects.
Choose adjustable LED strips with remote controls for convenient customization and ensure they’re cuttable for perfect sizing and future projects.
Verify the LED strip’s voltage matches your power source—most require 12V supply to prevent damage. Limit yourself to two spools maximum to maintain compatibility and prevent overload issues.
Choosing a Compatible Power Supply
Choosing the right power supply guarantees your LED strips function properly and last longer.
You’ll need a 12V DC output with at least 2 amps for a standard 5-meter strip to guarantee peak performance. Before purchasing, calculate the total current draw of all your LED strips to prevent overloading your power source.
Here are three key considerations when selecting your power supply:
- Match voltage and current specifications – Verify your LED strip’s requirements to prevent damage or malfunction.
- Check for barrel jack compatibility – Most LED strip kits include this connector for easy setup.
- Consider repurposing existing adapters – Old phone chargers or electronics adapters work if they meet your voltage and amperage needs.
Always prioritize safety by choosing a power supply that slightly exceeds your calculated requirements.
Preparing the LED Strip for Installation
Proper preparation transforms your LED strip installation from a frustrating puzzle into a smooth process. Start by measuring your bed’s perimeter to determine the required strip length—typically 5 meters for single beds and more for larger sizes. Check voltage compatibility between your LED strip and power source to prevent damage.
| Step | Action | Tool Required |
|---|---|---|
| 1 | Measure bed perimeter | Measuring tape |
| 2 | Cut at designated marks | Scissors |
| 3 | Remove adhesive backing | None |
| 4 | Secure corners | Clips/staples |
Cut your LED strip only at designated cut marks to avoid damaging the circuitry. Peel off the wax paper backing to expose the adhesive surface. Gather scissors for cutting and consider clips or staples for securing corners during installation for added stability.
Cutting LED Strips at Designated Marks
While LED strips might look like continuous ribbons of light, they’re actually engineered with strategic cut points that allow you to customize their length without destroying the circuit.
These cut marks typically appear every 3 to 5 LEDs and show exactly where you can safely trim your strip.
When you’re ready to cut, follow these essential steps:
- Locate the designated marks – Look for scissors symbols or copper pads that indicate safe cutting zones
- Use sharp scissors or cutting tools – Make clean, precise cuts to prevent circuit damage and short circuits
- Inspect after cutting – Check for exposed wires or damaged sections that could compromise safety
Always align positive and negative terminals correctly when connecting sections, and consult your manufacturer’s specific guidelines since cutting instructions vary between brands.
Connecting Multiple LED Strip Sections
After cutting your LED strips to the desired lengths, you’ll need to connect these sections to create a continuous lighting system for your bed frame.
First, verify that all strip sections have matching voltage ratings—typically 12V or 24V—to prevent damage. Use either solderless connectors included with your LED kit or employ proper soldering techniques for secure electrical connections.
Pay attention to maximum run lengths recommended by the manufacturer, as exceeding these limits causes voltage drop and uneven brightness. The connectors provided with most LED strip kits make joining sections straightforward without complex wiring.
Before permanent installation, test each connected section individually to guarantee proper functionality.
This verification step helps identify any connection issues early in the process.
Cleaning and Preparing the Bed Frame Surface
You’ll need to clear your bed frame of all bedding and accessories before starting the cleaning process.
Remove surface dirt and dust with a damp cloth, then use rubbing alcohol on metal frames to eliminate any residue that could weaken the LED strip’s adhesive.
Let the frame dry completely and sand down any rough spots to create the smooth, clean surface your LED strips require for proper adhesion.
Surface Dirt Removal
Clear away all bedding, pillows, and accessories from your bed frame to create a clean workspace for the LED installation.
You’ll need a completely exposed surface to properly clean and prepare for ideal adhesive adhesion.
Use a microfiber cloth or damp sponge with mild detergent solution to thoroughly wipe down the entire frame.
Remove all dust, dirt, and residue that could interfere with the LED strip’s attachment quality.
For effective surface preparation, follow these essential steps:
- Target stubborn areas – Use a gentle scrub brush or specialized cleaner safe for your frame’s material on persistent stains or grime.
- Ensure complete dryness – Allow wooden frames to dry completely after cleaning to prevent moisture from compromising adhesive quality.
- Verify readiness – Confirm the surface is fully dry and clean before proceeding with LED strip installation.
Adhesive Area Preparation
Three critical factors determine whether your LED strips will maintain a secure, long-lasting bond with your bed frame: surface cleanliness, proper drying, and optimal adhesive conditions.
After removing surface dirt, you’ll need to create ideal adhesion conditions for your LED strips.
If your bed frame has a glossy or slick finish, lightly sand the installation areas to give the adhesive better grip. This roughened surface prevents future peeling and guarantees stronger bonding.
Check that existing finishes or coatings won’t react negatively with adhesive products. Some finishes can cause the adhesive to fail or damage the frame’s appearance.
Verify you’re working in a dry environment with low humidity, as moisture interferes with adhesive performance and can cause long-term bonding failures.
Applying LED Strips to the Bed Frame
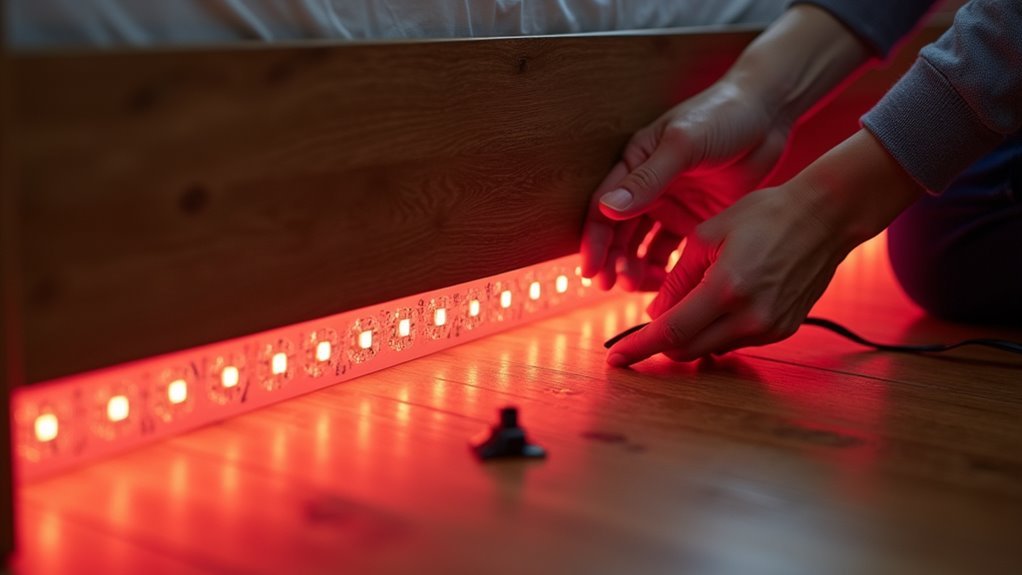
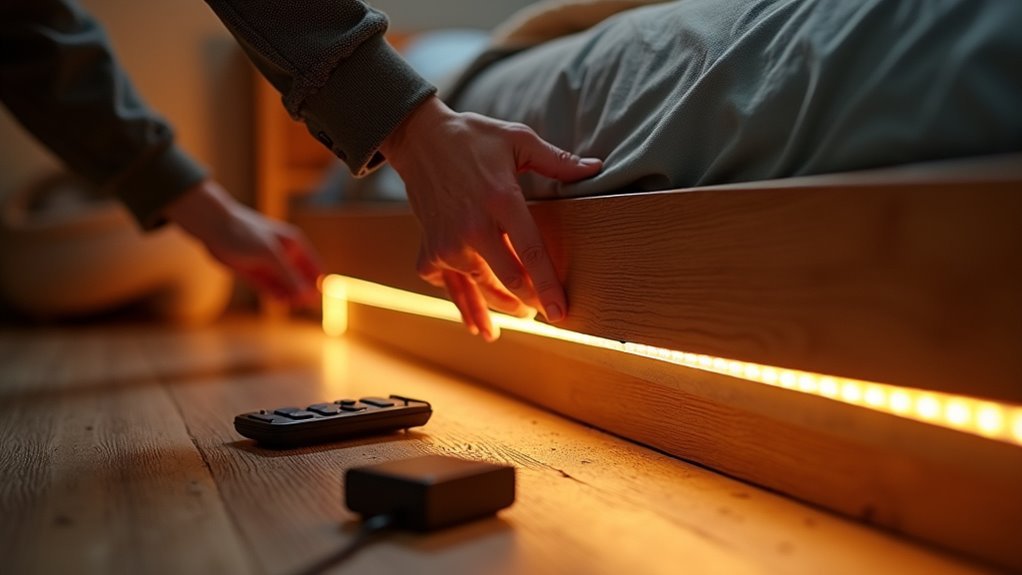
Now you’ll apply the LED strips by peeling off the adhesive backing and pressing them firmly along your bed frame’s edges, starting from one corner and working systematically around the perimeter.
Pay special attention to corners where you’ll need to create smooth changes without kinking the strip, and consider using small staples for extra security on challenging surfaces.
Position your controller box in an accessible but discreet location where you can easily reach it while keeping cables neat and hidden.
Adhesive Strip Placement
Before applying your LED strips, you’ll need to prepare both the surface and the strip itself for ideal adhesion. Start by cleaning your bed frame thoroughly to remove any dust, oils, or debris that could prevent proper bonding.
Once the surface is completely dry, you’re ready to begin installation.
Follow these essential steps for proper adhesive strip placement:
- Remove the backing – Peel off the wax paper from the LED strip’s adhesive backing to expose the sticky surface.
- Position carefully – Align the strip along your bed frame’s perimeter, applying gentle pressure as you progress.
- Secure corners – Use staples (not staple guns) at turns and corners to prevent lifting without damaging the strip.
Place your controller box conveniently near the strip’s starting point for easy access.
Securing Corner Connections
Corners present the biggest challenge when installing LED strips, as these areas require extra attention to prevent lifting and maintain proper electrical connections.
You’ll need to cut your strips at designated cut marks to guarantee clean fits around corners without damaging the circuitry. Use staples to secure corner sections, but avoid staple guns since they can damage both the strip and bed frame.
If corners won’t adhere properly, apply small amounts of duct tape temporarily to hold strips in place while the adhesive sets.
Before installation, clean all corner surfaces thoroughly to remove dust that prevents ideal adhesion.
Position your controller box near the strip’s starting point for easy access after installation is complete.
Controller Box Positioning
After securing your corner connections, you’ll need to position the controller box strategically before applying the LED strips to your bed frame. Proper controller placement guarantees easy access for adjustments and prevents connectivity issues during installation.
Here are three essential positioning considerations:
- Place near the starting point – Position the controller box close to where your LED strip begins for ideal signal strength and easier initial setup.
- Guarantee accessible location – Choose a spot where you can easily reach the controls for brightness adjustments and mode changes without crawling under the bed.
- Use temporary mounting – Consider using duct tape for non-permanent attachment, allowing you to reposition the controller if needed without damaging your bed frame or the device itself.
Installing the LED Controller and Remote
Once you’ve positioned your LED strips around the bed frame, you’ll need to set up the controller and remote system that powers and controls your lighting.
Connect the LED strip to the controller by carefully aligning the connectors, ensuring they’re secure for consistent performance. Position the controller box near the strip’s starting point for easy access when making adjustments.
Secure connections between LED strips and controllers are essential for reliable performance and easy maintenance access.
Test your connection by powering on the LED strip and using the remote to verify it responds correctly to color changes, brightness adjustments, and lighting effects.
If you’re adding automation, connect a timer to the power supply to schedule your lights’ on/off times, which enhances convenience and reduces energy consumption while maintaining your desired lighting schedule.
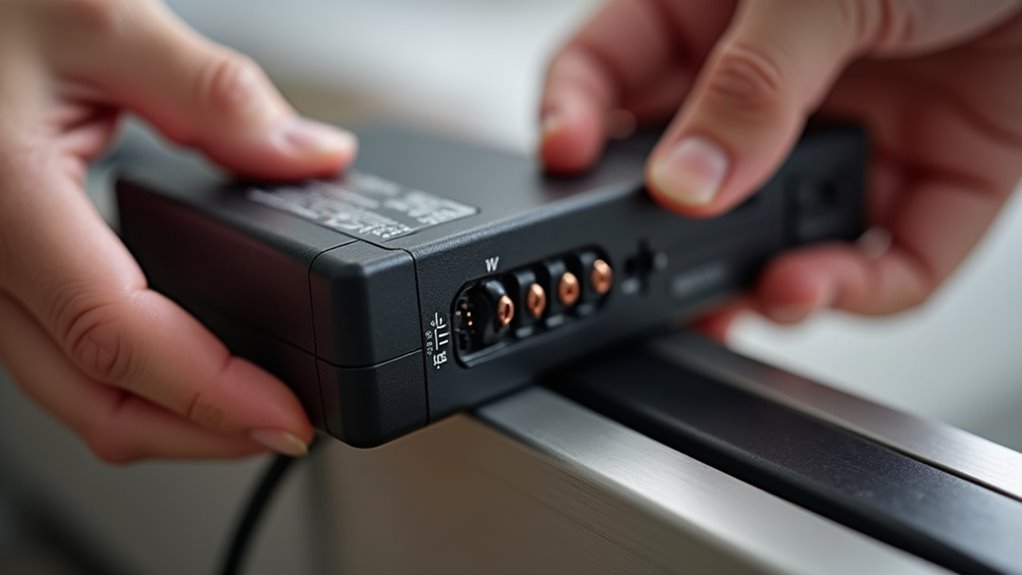
Wiring the Power Supply Connection
With your controller and remote system ready, you’ll now connect the power supply that drives your entire LED setup. This connection guarantees your LED strips receive consistent, safe power for peak performance.
Follow these essential steps for proper power supply wiring:
- Match voltage specifications – Verify your LED strip’s voltage (typically 12V) matches your power supply’s output to prevent damage.
- Check amperage requirements – Use a power supply rated for at least 2 amps for standard 5-meter LED strips to guarantee adequate power delivery.
- Secure all connections – Connect using the included barrel jack and double-check polarity to avoid malfunction or permanent damage.
If you’re repurposing an existing power adapter, verify its compatibility and current rating to prevent circuit overloading during operation.
Testing the LED System Functionality
Before declaring your LED bed frame installation complete, you’ll need to verify that every component functions properly through systematic testing. Connect the power supply to your LED strip and secure all connections to prevent issues. Use your remote control or compatible app to cycle through colors and modes, ensuring the strip responds correctly to commands.
Test brightness settings thoroughly to check for flickering or dimming problems. The strip should operate smoothly across all levels. Set timer functionality to turn on and off at specific intervals, confirming your LED system follows customized lighting schedules.
| Test Component | Verification Method |
|---|---|
| Color/Mode Response | Cycle through all options via remote/app |
| Brightness Levels | Test all settings for smooth operation |
| Timer Function | Set automated on/off intervals |
Finally, inspect for loose connections or adhesive failures.
Adding Timer Controls for Automated Operation
Adding timer controls transforms your LED bed frame from a manually operated system into a smart, automated lighting solution that adapts to your daily routine.
You’ll want to select a mechanical outlet timer that matches your LED strip’s total wattage to prevent overload damage.
Here’s how to set up your timer system:
- Choose the right timer – Select one with multiple programming options for different lighting schedules throughout the day.
- Connect properly – Plug your LED power supply directly into the timer socket for automated control.
- Program settings – Set dimming schedules for bedtime and brightening routines for wake-up times.
Once installed, you’ll need to regularly check timer settings and connections to maintain reliable operation.
Adjust programming as needed for seasonal changes or when your sleep schedule shifts, ensuring your lighting remains perfectly synchronized with your lifestyle.
Frequently Asked Questions
How to Set up LED Lights on Bed Frame?
You’ll measure your bed frame’s perimeter, cut LED strips to fit, peel adhesive backing, attach strips to the frame, connect to 12V power supply, and position the controller for easy access.
How Long Does a Bed Frame Take to Put Together?
You’ll typically spend 30 minutes to 2 hours assembling a bed frame, depending on its complexity. Simple frames take under 30 minutes, while elaborate designs with storage require more time and effort.
Is It Safe to Put LED Lights on Bed Frame?
Yes, you can safely install LED lights on your bed frame. They operate on low voltage, generate minimal heat, and won’t cause burns or fires when properly attached using appropriate clips or adhesive backing.
How Do You Anchor a Bed Frame?
You’ll anchor your bed frame by first identifying your flooring type, then using L-brackets to secure it to walls or floor. For carpets, add rubber pads underneath legs to prevent sliding and movement.


Leave a Reply