
You’ll need more than just a Raspberry Pi and enthusiasm to build your own Magic Mirror. While the concept seems straightforward—mount a display behind two-way glass and run some software—the reality involves multiple configuration steps that can make or break your project. From hardware compatibility issues to network setup challenges, there’s a specific sequence you must follow to avoid the common pitfalls that frustrate most first-time builders.
Raspberry Pi Hardware Requirements and Preparation
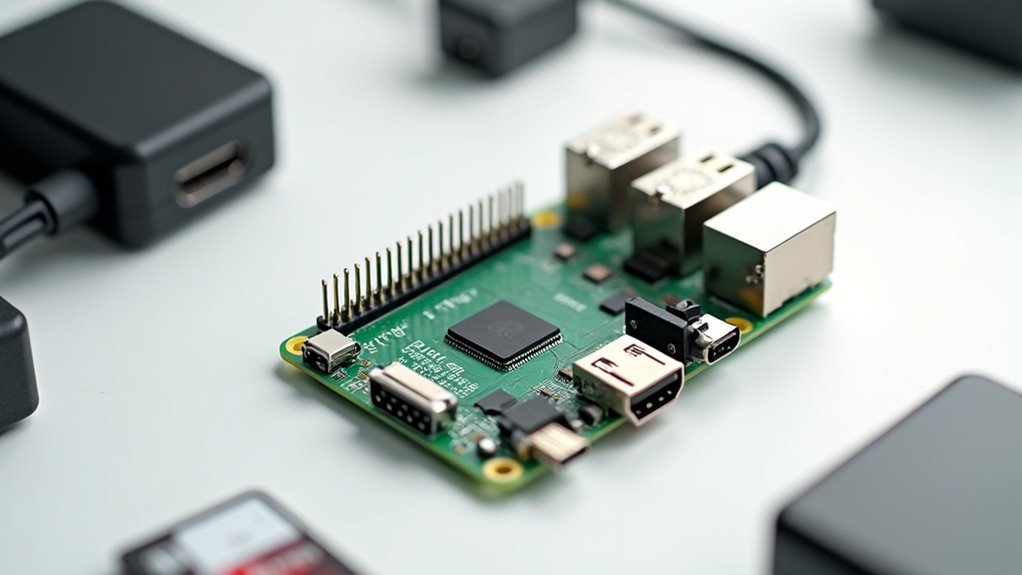
Five essential components form the foundation of your Magic Mirror project, starting with the Raspberry Pi board itself.
You’ll need a Raspberry Pi 3 Model B with at least 1GB of RAM and a 5V/2.4A power supply for peak performance.
Grab a high-speed 8GB microSD card to store the Raspberry Pi OS and software, ensuring faster read/write speeds during operation.
For your display setup, any HDMI-compatible monitor and cable will work based on your preferences.
Add a wireless mini keyboard and mouse combo to navigate through the initial Pi setup process easily.
Before installation, format your microSD card using SD Card Formatter, then write the Raspbian OS image with Win32 Disk Imager to prevent data corruption during preparation.
Downloading and Formatting the SD Card With Raspbian OS
Three critical steps will get your Raspberry Pi ready for the Magic Mirror software installation.
First, download the latest Raspbian OS image from the Raspberry Pi Foundation website. You’ll need this operating system foundation before you can install the software.
Download the latest Raspbian OS image from the official Raspberry Pi Foundation website as your essential operating system foundation.
Next, extract the downloaded file using 7-Zip rather than Windows’ built-in extraction tool for better performance.
Then format your SD card using SD Card Formatter, selecting the FULL erase option to guarantee peak performance.
Write the extracted OS image to the SD card using Win32 Disk Imager, running it as Administrator to prevent permission issues.
Finally, properly eject the SD card from your computer to avoid data corruption before inserting it into your Raspberry Pi.
Initial Boot Process and Basic System Configuration

You’ll insert the SD card into your Raspberry Pi and connect the power to begin the first boot, which takes longer than normal due to automatic filesystem expansion and initial setup tasks.
Once the desktop loads, you’ll access the configuration tool by opening the terminal and running `sudo raspi-config` to customize essential system settings.
The configuration process lets you set your locale, timezone, and keyboard layout before rebooting to apply all changes.
First Boot Setup
With your freshly prepared SD card in hand, insert it into the Raspberry Pi’s SD card slot, connect your monitor via HDMI, attach a keyboard and mouse, then power on the device to begin the first boot process. The operating system will take several minutes to initialize as it configures essential settings.
Once booted, click the terminal icon and run `sudo raspi-config` to access the configuration tool. You’ll need to adjust several critical settings:
| Configuration Option | Purpose | Location |
|---|---|---|
| Expand Filesystem | Utilizes full SD card capacity | Advanced Options |
| Locale Settings | Sets language preferences | Internationalisation Options |
| Timezone/Keyboard | Configures regional settings | Internationalisation Options |
The first boot requires patience, but these configurations guarantee peak performance for your Magic Mirror installation.
Configuration Tool Access
As your Raspberry Pi completes its initialization, you’ll need to access the system configuration tool to optimize the device for Magic Mirror deployment.
Open the terminal by clicking the terminal icon in the graphical interface and run `sudo raspi-config`. This configuration tool provides essential system settings that affect Magic Mirror’s performance.
Navigate to “Expand Filesystem” to utilize your SD card’s full storage capacity.
Next, access “Internationalisation Options” to configure your locale, timezone, and keyboard layout according to your preferences. These settings guarantee Magic Mirror displays information correctly for your region.
After making changes, save your settings and exit the tool.
Reboot your Raspberry Pi to apply the updated configurations before proceeding with Magic Mirror installation.
Filesystem Expansion Options
Since the Raspberry Pi’s default partition doesn’t automatically utilize your entire SD card capacity, expanding the filesystem becomes a critical first step in your Magic Mirror setup.
When you run `sudo raspi-config`, you’ll find the filesystem expansion option in the main menu. Select “Expand Filesystem” to guarantee your system can access the full storage capacity of your SD card.
This configuration step is essential because the default image creates a smaller partition that leaves unused space on larger cards. After selecting this option, the system will automatically resize the partition during the next reboot.
You’ll notice the first boot takes longer due to this expansion process, but subsequent boots will be faster. This filesystem expansion provides the necessary storage space to install Magic Mirror and its dependencies properly.
Setting Up Internationalization Options and Locale Settings
Before your Magic Mirror can display information in your preferred language and format, you’ll need to configure the internationalization settings on your Raspberry Pi.
Access the Internationalization Options by selecting option 5 in the `raspi-config` tool. Start by changing the Locale (I1) to your preferred language, guaranteeing you select the UTF version for proper Unicode support.
Next, adjust the Timezone (I2) by maneuvering through the geographic regions to find your specific timezone. If you’re using a non-standard keyboard, modify the Keyboard Layout (I3) option to guarantee correct key mappings.
After configuring these language, timezone, and keyboard settings, save your changes before exiting to apply them upon reboot.
Configuring Wireless Network Connectivity
You’ll need to establish a wireless connection for your Raspberry Pi to facilitate your Magic Mirror’s internet-dependent features.
Start by configuring your WiFi settings through the `wpa_supplicant.conf` file, where you’ll enter your network credentials with proper formatting.
Once configured, you can verify the connection using built-in command-line tools to confirm your Pi successfully connects to your home network.
WiFi Configuration Setup
Connecting your Raspberry Pi to your wireless network requires editing a configuration file that stores your WiFi credentials.
You’ll need to modify the wpa_supplicant.conf file to establish proper wifi configuration. Open the terminal and run `sudo nano /etc/wpa_supplicant/wpa_supplicant.conf` to access the configuration file.
Add your network’s SSID and password, using quotation marks around names containing spaces. Save your changes by pressing CTRL-X, then confirm with Y.
Reboot your Raspberry Pi to apply the new settings. Use the `ifconfig` command to verify connectivity by checking the wlan0 section for a valid IP address.
If you’re experiencing connection problems, review your wpa_supplicant.conf entries and confirm your router isn’t blocking access.
Connection Verification Methods
How can you confirm that your Raspberry Pi has successfully connected to your wireless network? You’ll need to verify the connection using several reliable methods to ascertain proper functionality.
Here are four essential steps to confirm your network connection:
- Execute the `ifconfig` command in terminal and examine the `wlan0` section for a valid IP address assignment.
- Check the IP address range to verify it falls within your private network (typically 192.168.25.x format).
- Look for the blue WiFi icon in the graphical interface, which indicates successful network connectivity.
- Reboot your Raspberry Pi after editing `wpa_supplicant.conf` to establish the wireless connection properly.
If connection fails, double-check your `wpa_supplicant.conf` entries for correct formatting, including proper quotation marks around network names and passwords.
Verifying Network Connection and Troubleshooting
Why might your Raspberry Pi struggle to connect to your home network during the Magic Mirror installation process?
You’ll need to verify your network connection systematically to identify issues. Start by running `ifconfig` in the terminal to check for a valid IP address under wlan0 for wireless connections or eth0 for wired ones. Confirm your IP address falls within the 192.168.x.x range, confirming successful home network connection.
Use ifconfig to verify your Raspberry Pi has obtained a valid IP address within the 192.168.x.x range for proper network connectivity.
If you’re experiencing connectivity problems, edit the `wpa_supplicant.conf` file and verify your Wi-Fi credentials include proper quotation marks around network names or passwords with spaces.
Test connectivity using the `ping` command to reach your router. Check your router settings for device blocks and confirm you’re within Wi-Fi signal range.
System Cleanup and Storage Management
Before you proceed with installing Magic Mirror software, you’ll need to verify your Raspberry Pi has adequate storage space and isn’t cluttered with unnecessary files.
Start by checking your current storage state:
- Run `df -h` to assess used and available space on your filesystem.
- Execute `sudo apt-get autoremove` to remove unneeded packages that consume valuable storage.
- Perform `sudo apt-get update` followed by `sudo apt-get upgrade` to keep your system efficient.
- Monitor that you maintain at least 10-20% free space to prevent installation issues.
After running cleanup commands, you’ll typically see significant improvements – users often reduce usage from 48% to 30% full.
Regular storage monitoring guarantees smooth software installations and efficient system performance throughout your Magic Mirror setup process.
Updating Package Lists and Upgrading System Components
Once you’ve cleared sufficient storage space, you’ll need to refresh your system’s package information and install the latest software updates.
Start by updating package lists using `sudo apt-get update`, which retrieves the latest available package versions from repositories. This command doesn’t install anything—it simply refreshes your system’s knowledge of what’s available.
Next, upgrade your installed packages with `sudo apt-get upgrade` to install the latest versions. You can streamline this process by combining both commands: `sudo apt-get update ; sudo apt-get upgrade`. This guarantees both package lists and installed software are current in one operation.
Regular updates provide essential security patches and software improvements, optimizing your Raspberry Pi’s performance for the Magic Mirror installation ahead.
Firmware Updates and System Reboot
While package updates keep your software current, firmware updates guarantee your Raspberry Pi’s underlying system operates with the latest features and critical fixes.
Since your Magic Mirror will rely heavily on stable hardware functionality, you’ll want to make sure you’re running the latest version of the firmware.
Your Magic Mirror’s performance depends on rock-solid hardware foundations, making current firmware absolutely essential for reliable operation.
Follow these steps to update your firmware:
- Execute `sudo rpi-update` to manually download and install the newest firmware.
- Wait for the update process to complete – don’t interrupt it.
- Run `sudo reboot` to restart your system and activate the changes.
- Verify the update worked by checking `vcgencmd version` after the system reboot.
This firmware update process makes certain your Raspberry Pi’s foundational systems are optimized before installing Magic Mirror software.
Installing NodeJS and Setting Up NodeSource Repository
Before you can install Magic Mirror software, you’ll need to set up NodeJS on your system through the NodeSource repository.
This process involves configuring the repository, running specific installation commands, and verifying that everything’s working correctly.
Let’s walk through each step to guarantee you’ve got the proper NodeJS environment ready for your Magic Mirror installation.
NodeSource Repository Setup
Setting up the NodeSource repository requires adding their official package source to your Raspberry Pi’s system, which guarantees you’ll receive the most current and stable version of NodeJS for your MagicMirror installation.
Follow these essential steps to properly configure the repository:
- Update your package list with `sudo apt-get update` to ascertain your system has the latest package information before proceeding.
- Add the NodeSource repository using `curl -sL https://deb.nodesource.com/setup_14.x | sudo -E bash -` to prepare your system for NodeJS version 14.x installation.
- Install NodeJS and npm by running `sudo apt-get install -y nodejs`, which automatically includes the Node Package Manager.
- Verify successful installation by checking versions with `node -v` and `npm -v` commands to confirm compatibility with MagicMirror requirements.
NodeJS Installation Commands
Once you’ve configured the NodeSource repository, executing the actual NodeJS installation commands becomes a straightforward process that’ll prepare your system for MagicMirror².
Install NodeJS by running `sudo apt-get install -y nodejs` in your terminal. This command downloads and installs the complete NodeJS package along with npm automatically.
Verify your NodeJS installation by executing `node -v` to display the version number. You’ll also want to confirm npm installed correctly by running `npm -v`. Both commands should return version numbers if the installation succeeded.
The NodeJS version should be 14.x or higher to guarantee compatibility with Magic Mirror and its various modules.
These installation commands establish the foundation you’ll need for successfully running MagicMirror² on your system.
Version Verification Process
Three essential verification steps will confirm your NodeJS installation works correctly for MagicMirror².
Before proceeding with MagicMirror² installation, you’ll need to complete the version verification process to validate Node.js and npm are properly installed on your Raspberry Pi.
- Update your system by running `sudo apt-get update` and `sudo apt-get upgrade` to guarantee you’re working with the latest packages.
- Configure NodeSource repository by executing `curl -sL https://deb.nodesource.com/setup_14.x | sudo -E bash -` to establish the Node.js 14.x repository.
- Install Node.js and npm using `sudo apt-get install -y nodejs`, which automatically installs both components.
- Verify installation by running `node -v` and `npm -v` to confirm version numbers appear correctly in your terminal.
Cloning MagicMirror² Repository and Running Installation
After you’ve prepared your Raspberry Pi with the necessary operating system and dependencies, you’ll need to download the MagicMirror² source code from its official repository.
Open your terminal and clone the repository by executing `git clone https://github.com/MichMich/MagicMirror.git`. This downloads all necessary files to your local machine.
Navigate into the downloaded directory using `cd MagicMirror`.
Next, install all required dependencies by running `npm install`. This command sets up essential packages for proper functionality.
Once installation completes, create your configuration file by copying the sample: `cp config/config.js.sample config/config.js`. This allows you to customize settings later.
Finally, launch MagicMirror² with `npm start`. The application will start in your terminal, displaying the initial mirror interface.
Configuring Display Settings and Screen Rotation
Since your MagicMirror² installation is complete, you’ll need to optimize the display settings to achieve the best viewing experience. Proper configuration guarantees your mirror displays in portrait orientation and prevents unwanted screen blanking.
Follow these essential steps to configure your display:
- Rotate the display by editing `/boot/config.txt` with `sudo nano /boot/config.txt` and adding `display_rotate=1` for 90-degree rotation.
- Disable screensaver by modifying `~/.config/lxsession/LXDE-pi/autostart` and adding `@xset s noblank`, `@xset s off`, and `@xset -dpms`.
- Configure LightDM by editing `/etc/lightdm/lightdm.conf` and changing the `xserver-command` line to `xserver-command=X -s 0 -dpms`.
- Apply changes by saving with CTRL-X, confirming with Y, then running `sudo reboot` to restart your Pi.
Setting Up Automatic Startup and Screen Saver Options
With your display properly configured, you’ll want to make certain MagicMirror² launches automatically every time your Raspberry Pi boots up and stays running without interruption.
Install PM2 process manager using `sudo npm install -g pm2`, then run `pm2 startup` to configure autostart functionality for your system.
Create a shell script called `mm.sh` that navigates to your MagicMirror directory and executes `DISPLAY=:0 npm start`.
Make it executable with `chmod +x mm.sh`, then launch it using `pm2 start mm.sh` followed by `pm2 save` to preserve the configuration.
To prevent screen blanking, edit `~/.config/lxsession/LXDE-pi/autostart` and add `@xset s noblank`, `@xset s off`, and `@xset -dpms`.
Additionally, modify `/etc/lightdm/lightdm.conf` by adding `xserver-command=X -s 0 -dpms` under the `[SeatDefaults]` section.
Testing Installation and Accessing Configuration Files
Once you’ve completed the startup configuration, you’ll need to verify that your MagicMirror² installation works correctly before moving forward.
To test the installation and customize your setup:
- Launch MagicMirror² – Run `npm run start` in your terminal to start the application and verify it displays properly.
- Check default modules – Look for the Clock, Calendar, and Weather modules on your screen to confirm everything’s working.
- Access the config file – Navigate to `~/MagicMirror/config/config.js` using `nano` or your preferred text editor to customize settings and explore modules you can add.
- Apply changes – After modifying configurations, restart using `npm start` to see your updates take effect.
If issues arise, check terminal output for error messages indicating installation problems.
Frequently Asked Questions
How to Install a Smart Mirror?
You’ll need a Raspberry Pi, monitor, and two-way mirror. Update your Pi’s OS, install MagicMirror² software using the automated installer script, configure settings, disable screensaver, and set automatic startup.
How to Install Magic Mirror on Raspberry Pi 5?
You’ll install Node.js first, then clone the MagicMirror repository from GitHub. Navigate to the directory, run npm install for dependencies, copy the sample config file, customize it, and start with npm start.
Which OS for Magic Mirror?
You’ll want to use Raspberry Pi OS with desktop environment (Raspbian) for Magic Mirror. It’s the recommended operating system that provides necessary libraries, user-friendly interface, and full compatibility with Node.js requirements.
How to Start Magic Mirror From Terminal?
Navigate to your MagicMirror directory using `cd ~/MagicMirror`. Then execute `DISPLAY=:0 npm start` to launch the application. You’ll need Node.js installed properly. Alternatively, use `pm2 start mm.sh` if you’ve configured PM2.


Leave a Reply