
You’re staring at that outdated doorbell, knowing it needs to go, but worried you’ll leave behind unsightly holes or damaged paint. The good news is that most doorbells can be removed cleanly with the right approach and tools. However, there’s an essential first step that many homeowners skip – one that could mean the difference between a simple weekend project and an expensive repair job.
Understanding Your Doorbell Type

Before you begin removing your doorbell, you’ll need to identify whether you’re working with a wired or wireless model. Understanding your doorbell type is vital because removal procedures differ markedly between configurations.
Wired models like Ring Doorbell Pro, Pro 2, and Elite require constant power sources and involve disconnecting two electrical wires during removal. Battery-powered options such as Ring Doorbell 3, 3 Plus, and 4 simply need battery detachment.
To remove a doorbell safely, locate your installation manual or guidelines specific to your model. This documentation provides essential information for proper removal techniques.
Ring Doorbell Wired falls somewhere between these categories, combining elements of both configurations. Identifying your exact model prevents damage and guarantees you follow the correct removal process.
Essential Tools and Safety Equipment
You’ll need specific screwdrivers including Phillips and Torx bits to handle various doorbell mounting systems effectively.
Wire handling tools like needle-nose pliers and wire nuts guarantee you can safely disconnect and cap electrical connections without risking shock or damage.
Wall protection materials such as painter’s tape and cardboard shields prevent scratches and gouges when prying the doorbell unit from your siding or brick surface.
Required Screwdriver Types
When removing your doorbell safely, having the right screwdriver types makes the process straightforward and prevents damage to both the device and your home’s electrical system.
You’ll primarily need a Phillips-head screwdriver for most Ring Doorbell models, as it’s the standard fastener used in their construction. However, some newer models feature T15 Torx security screws that require a specialized Torx screwdriver to remove the doorbell properly.
Keep a flathead screwdriver handy for prying off faceplates and maneuvering around delicate components without scratching surfaces. The flathead tool helps you gently separate plastic housing parts that might be tightly fitted.
Having both screwdriver types readily available guarantees you won’t encounter delays or force incompatible tools, which could strip screws or crack the doorbell housing during removal.
Wire Handling Tools
Beyond the basic screwdrivers, proper wire handling tools protect you from electrical hazards and guarantee a clean removal process.
You’ll need a voltage tester to confirm wires aren’t live before touching them. Wire nuts are essential for safely capping disconnected wires, preventing accidental contact or short circuits.
Invest in quality insulated gloves and safety goggles to shield yourself from electrical shocks and debris.
When you remove a Ring Doorbell, having a micro USB cable ready helps discharge battery-powered units completely before disconnection.
A wire stripper becomes necessary if you need to cut or prepare low voltage wires for proper termination.
Don’t forget to label your wires during removal—this simple step prevents confusion during reinstallation and reduces the risk of wiring errors later.
Wall Protection Materials
Since wall damage ranks among homeowners’ top concerns during doorbell removal, protecting surrounding surfaces requires specific materials and techniques.
You’ll need painter’s tape to cover areas around your doorbell, creating a protective barrier against scratches and scuffs. Place a drop cloth or old towel on the floor beneath your work area to catch falling debris and prevent flooring damage.
Essential wall protection materials include:
- Plastic putty knife or padded pry bar – These tools let you gently detach the doorbell without gouging the wall surface.
- Heat gun or hairdryer – Apply low heat to soften stubborn adhesive, making removal easier and less damaging.
- Spackling compound and putty knife – Keep these ready to quickly fill small holes or imperfections after removal.
Power Disconnection and Safety Precautions
Before you start removing your doorbell, you’ll need to cut power at the circuit breaker to eliminate any risk of electrical shock.
Once the power’s off, you must handle any 120V wires with extreme care, capping them with wire nuts if they’re disconnected.
Throughout this entire process, wear safety gloves to protect yourself from sharp edges and potential electrical hazards.
Turn Off Circuit Breaker
When removing a doorbell, your first priority must be cutting power to the device by turning off the appropriate circuit breaker at your electrical panel. This critical safety step prevents electric shock and protects you from potentially dangerous 120V connections during the removal process.
Follow these essential steps to safely disconnect power:
- Locate the correct circuit breaker – Find the breaker labeled for your doorbell or front entrance lighting circuit.
- Switch the breaker to the OFF position – Verify it’s completely disengaged and won’t accidentally flip back on.
- Test the doorbell – Press the button to confirm no power flows to the device before proceeding.
Never attempt to remove doorbell wiring while circuits remain energized, as this poses serious electrocution risks.
Handle 120V Wires Safely
With the circuit breaker off and power confirmed dead, you can now safely handle the 120V wires connected to your doorbell transformer.
Even though power’s disconnected, you’ll want to handle 120v wires safely by wearing insulated safety gloves and using insulated tools throughout the process.
Carefully disconnect the high-voltage wires from the transformer terminals, taking note of their original positions for future reference.
Once disconnected, immediately cap each 120V wire with wire nuts to prevent any accidental contact.
This step’s essential whether you’re doing a permanent removal or planning to remove Ring Doorbell Without replacing it.
Keep these capped wires accessible within the junction box for future electrical work while ensuring they’re properly secured and won’t come loose over time.
Use Proper Safety Equipment
Proper safety equipment forms your primary defense against electrical hazards during doorbell removal.
Before touching any wires or components, you’ll need essential protective gear to prevent injury and guarantee a safe working environment.
Essential safety equipment includes:
- Safety gloves – Protect your hands from sharp edges, electrical contact, and potential cuts from metal components or mounting hardware.
- Non-contact voltage tester – Verify that wires aren’t live after you turn off the circuit breaker, guaranteeing complete electrical safety before handling connections.
- Wire nuts – Cap any exposed 120V connections if you’re removing the transformer, preventing accidental contact with live wires during the process.
Always confirm your circuit breaker is off and test all connections before proceeding with removal work.
Removing the Doorbell Faceplate
Begin by locating any security screws at the bottom of your doorbell unit and remove them with the included screwdriver if they’re present.
Once you’ve addressed the screws, gently pull the removable faceplate upward and outward at a 45-degree angle to detach it from the doorbell body. Don’t apply excessive force during this process, as it can cause damage.
For wired models, watch for plastic tabs that may need disengaging to prevent breaking the faceplate or doorbell mechanism.
Work in a well-lit, accessible area to minimize the risk of dropping components during removal.
If your doorbell uses a mounting bracket system, consult your model’s specific instructions before removing the entire unit to guarantee you don’t damage the wall during detachment.
Detaching Mounting Hardware

After removing the faceplate, you’ll need to locate the mounting screws that secure the doorbell’s bracket or base to your wall.
Use the appropriate screwdriver to carefully remove these screws, keeping them organized for potential reinstallation.
Once the screws are out, gently detach the mounting bracket by pulling it away from the wall, being mindful of any adhesive or caulk that might resist removal.
Locate Mounting Screws
Most doorbell mounting systems rely on two to four screws that secure the device to your wall or door frame.
Before you can remove these mounting screws, you’ll need to find them first.
Here’s how to locate your doorbell’s mounting screws:
- Check behind the faceplate – Gently pull the faceplate upward and outward at a 45-degree angle to reveal hidden screws.
- Inspect the bottom and back – Look for screws along the device’s edges, which may be standard Phillips or specialized security screws.
- Consult your manual – Review the manufacturer’s instructions for your specific model’s screw locations.
Once you’ve identified the screw type and location, gather the appropriate screwdriver.
Support the doorbell while preparing to remove the mounting hardware to prevent accidental damage.
Remove Security Hardware
Security screws and mounting hardware require careful handling to avoid damaging your doorbell or wall surface.
Begin by identifying the specific type of security screw your doorbell uses – many models feature Torx bits or specialized screwdriver heads. Use the appropriate tool to carefully remove each security screw, placing them in a container to prevent loss.
Once all security screws are removed, gently detach the faceplate by lifting it away from the mounting area. Don’t force the faceplate if it resists; instead, check for additional hidden screws.
With the faceplate removed, you’ll access the main mounting bracket. Support the doorbell unit with one hand while unscrewing the bracket screws with the other to safely detach the doorbell from your wall.
Disconnect Wall Brackets
Turn off the power at the breaker before proceeding with bracket removal to eliminate any risk of electrical shock.
Once you’ve safely detached the doorbell unit itself, you’ll need to remove wall brackets completely from your wall surface.
Follow these steps to disconnect the mounting hardware:
- Remove securing screws – Use your screwdriver to carefully unscrew all screws holding the brackets to the wall, keeping them organized for potential future use.
- Check for hidden clips – Examine the wall brackets thoroughly for any additional clips or fasteners that might still be securing the hardware.
- Inspect wall condition – After removing all mounting components, check for holes or damage that may require patching to restore your wall’s appearance.
Disconnecting Low Voltage Wiring
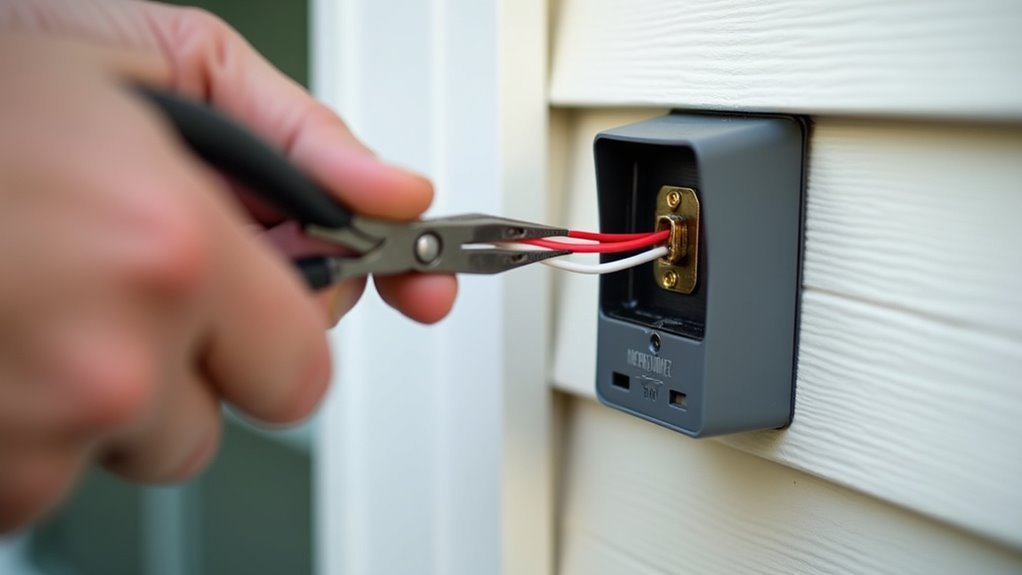
Before touching any wires, you’ll need to shut off power at the circuit breaker to eliminate electrical hazards during the disconnection process.
When disconnecting low voltage wiring, carefully loosen the terminal screws with a Phillips-head screwdriver to detach the wires from your doorbell unit without causing damage. This methodical approach guarantees you won’t harm the wiring or fixtures.
After removing the wires from terminals, cut them short to minimize future accidental reconnection risks. It’s essential to confirm these low voltage wires aren’t live after disconnection from the power source.
Push the cut wire ends back into the wall cavity to avoid leaving them exposed. While taping isn’t necessary for low voltage wires, make sure they’re safely capped if you’re leaving them inside the wall for potential future use.
Handling Transformer Considerations
You’ll need to locate your doorbell transformer, which is typically found in a closet, basement, or utility area where it converts high voltage to low voltage for your doorbell system.
Before touching any wires, turn off the circuit breaker that controls the transformer to safely handle the 120V electrical connections.
Once you’ve secured the power source, you can decide whether to completely remove the transformer or leave it in place for future doorbell installations.
Locating Doorbell Transformer
Where exactly is your doorbell transformer hiding in your home?
You’ll typically find your doorbell transformer tucked away in less obvious spots throughout your house. Since it converts high-voltage electricity to low-voltage power for your doorbell system, it’s usually mounted in utility areas away from daily foot traffic.
Check these common locations:
- Utility closets – Look on walls near electrical panels or water heaters
- Basement areas – Search along joists or mounted on foundation walls
- Garage spaces – Examine walls near electrical outlets or junction boxes
Before disconnecting anything, confirm you’ve found the correct transformer by tracing the low voltage wires back to your doorbell.
The transformer should have both 120V electrical wires and smaller gauge wires leading to your doorbell system.
Disconnecting Transformer Safely
Once you’ve located your doorbell transformer, safety becomes your top priority when handling the electrical connections. First, turn off the circuit breaker to eliminate electrocution risk from 120V wires. Confirm the transformer you’ve found is specifically connected to your doorbell system before proceeding.
When disconnecting transformer safely, you have two options: remove it completely or leave it in place. If removing, disconnect the low voltage wires first, then cap the 120V wires with wire nuts. Be careful not to damage surrounding wiring during removal. Cut low voltage wires short to prevent future reconnection.
If leaving the transformer, cap all wires securely and verify the junction box remains accessible for potential future modifications.
Wall Protection During Removal
Before attempting to remove your doorbell, protecting the surrounding wall surface should be your primary concern to avoid costly repairs later.
Wall mounting systems can cause significant damage if you’re not careful during removal. Here’s how to protect the wall effectively:
- Apply painter’s tape around the doorbell unit’s perimeter to create a protective barrier against scratches and paint damage.
- Use proper tools like a plastic putty knife or cloth-wrapped flathead screwdriver to gently pry the unit away from the surface.
- Support the doorbell with one hand while loosening screws to prevent it from falling and damaging the wall.
If screws are stuck, apply penetrating oil rather than excessive force.
After removal, fill any remaining holes with spackle for seamless repair.
Removing Without Specialized Tools
Most homeowners can successfully remove their doorbell using common household items instead of purchasing specialized tools.
Start by examining your doorbell for visible screws or clips that you can gently pry open with a flathead screwdriver. When removing the doorbell, avoid pulling directly on it to prevent damage. Instead, insert a dull edge tool to create space for safer removal.
Gently wiggle the doorbell while applying slight upward pressure to help detach it from the wall mount. If you encounter resistance, check for hidden screws or fasteners that may need loosening.
This approach allows you to complete the doorbell removal process using tools you likely already have at home.
Troubleshooting Stubborn Installations
When faced with a doorbell that won’t budge despite your best efforts, you’ll need to employ more targeted strategies to overcome stubborn installations.
First, carefully inspect the unit for hidden screws or brackets concealed beneath caulking or paint. These fasteners often go unnoticed but greatly complicate removal when overlooked.
Here are three effective techniques for stubborn doorbells:
- Apply gentle heat – Use a hairdryer to soften adhesive or caulking that’s binding the unit to the wall surface.
- Use leverage tools – Employ a flathead screwdriver or wedge tool with even pressure to gradually pry the doorbell away.
- Get assistance – Have someone stabilize the unit while you work, preventing sudden movements that could damage the wall.
Document any modifications you make during removal to help with future installations and assist others facing similar challenges.
Dealing With Adhesive and Caulking
Although some doorbells rely solely on screws for mounting, many installations include adhesive or caulking that creates an additional bond between the unit and your wall.
To safely break this connection, start by applying heat from a hairdryer to soften the adhesive or caulking materials. This makes removal considerably easier without excessive force.
Next, gently use a flathead screwdriver to pry around the edges, breaking the bond carefully. For better control, slide a putty knife or plastic scraper under the doorbell’s edges to separate it from the wall surface.
If caulking’s present, score around the doorbell’s perimeter with a caulk remover tool for cleaner removal.
Finally, clean any remaining adhesive residue using rubbing alcohol or commercial adhesive remover.
Capping and Securing Electrical Connections
After removing the doorbell from the wall, you’ll need to properly secure the electrical connections that powered the unit.
Before handling any wires, turn off the circuit breaker to prevent electrocution risks. This vital safety step protects you while working with electrical connections.
Follow these steps for proper capping:
- Use wire nuts – Securely cover exposed wire ends to prevent accidental contact and guarantee complete safety.
- Cut low voltage wires short – Trim them after disconnection to minimize reconnection risks, then push back into the wall.
- Tape individual wire ends – If leaving wires exposed temporarily, wrap each end separately to prevent short circuits.
Confirm the junction box remains accessible by capping the wires properly, allowing future access if electrical work becomes necessary.
Wall Repair and Restoration Techniques
Once you’ve secured the electrical connections, restoring the wall to its original condition becomes your next priority.
Begin wall repair by patching holes with high-quality spackling compound or drywall filler, applying it smoothly and allowing complete drying. Sand the patched area lightly with fine-grit sandpaper to create a flush surface that blends seamlessly with surrounding wall texture.
For adhesive-mounted doorbells, use a utility knife to carefully cut around adhesive edges, preventing drywall or paint damage.
Small nail holes need only paint touch-ups, while larger patches require priming before repainting for even color and texture.
Complete your restoration by repainting the entire wall section or using color-matching techniques to guarantee a seamless finish that masks repair evidence completely.
Post-Removal Device Storage and Disposal
Three key considerations determine the best approach for handling your removed doorbell: its current condition, your future plans, and environmental responsibility.
Post-removal device storage requires careful attention to prevent damage and deterioration.
For ideal post-removal device storage:
- Store in dry, secure location – Choose a moisture-free environment to prevent corrosion and component damage.
- Research electronic waste recycling options – Contact local facilities for proper disposal if the device is non-functional.
- Consider donation opportunities – Give operational doorbells to charities or community organizations.
Document all modifications made during removal for future reference.
If you’re keeping the doorbell, maintain it in protective packaging.
For non-working units, proper disposal through certified e-waste programs protects the environment from harmful components while ensuring responsible recycling practices.
Frequently Asked Questions
How to Take a Doorbell off the Wall?
Turn off power at the circuit breaker first. Unscrew the doorbell’s mounting screws with a screwdriver. Gently pull it from the wall, disconnect the wires, and cap them with wire nuts for safety.
Is It Safe to Touch Doorbell Wires?
You can safely touch doorbell wires after turning off the circuit breaker and confirming they’re not live with a voltage tester. They’re typically low voltage, but you should always verify there’s no current first.
How to Remove Ring Doorbell From Wall?
First, you’ll turn off power at the breaker. Remove the security screw, pull the faceplate at forty-five degrees, unscrew mounting screws, disconnect wires, and patch wall holes afterward.
How to Safely Remove Doorbell Chime?
Turn off the circuit breaker first. Unscrew the chime from the wall carefully. Disconnect the wires and cap them with wire nuts. Push wires into the wall, then patch and paint any holes.


Leave a Reply