
You’re standing at your front door, staring at a tangle of thin wires and wondering how something so simple can look so complicated. Whether you’re replacing a broken doorbell or installing a smart video doorbell, the wiring process doesn’t have to intimidate you. With the right approach and these seven essential tips, you’ll transform from a nervous beginner into someone who confidently handles doorbell installations—but only if you avoid the costly mistakes that catch most first-timers off guard.
Turn Off Power and Verify Safety Before Starting Any Wiring Work
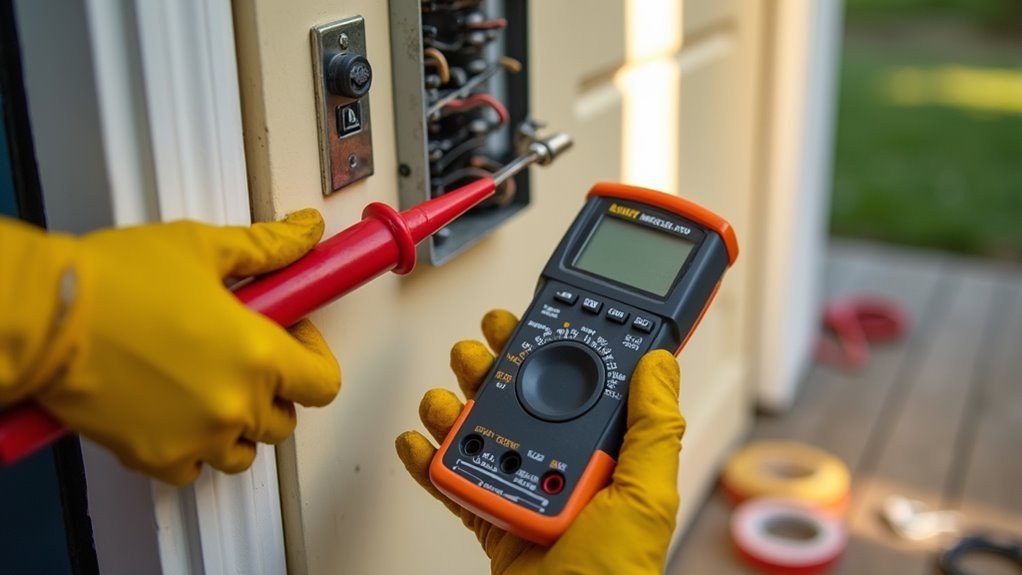
Before you touch a single wire, you’ll need to turn off the power at the circuit breaker to eliminate any risk of electric shock. Locate the circuit breaker dedicated to your doorbell system and switch it off.
Don’t assume the power supply is disconnected—always verify safety using a non-contact voltage tester on the wires before proceeding with any electrical work.
Label each wire before disconnecting them to prevent confusion during installation. This simple step saves time and reduces errors when reconnecting your new doorbell system.
Make sure all your tools and materials are ready and your workspace is clear of hazards. Taking these safety precautions before starting your wiring project protects you and guarantees a successful installation.
Identify Your Doorbell Components and Wiring Configuration
Once you’ve secured the power supply, you’ll need to identify the three main components that make up your wired doorbell system: the push button, chime, and transformer.
Each component serves a specific purpose in your doorbell’s operation, so understanding their roles is essential.
Understanding how each doorbell component functions is crucial for proper installation and troubleshooting of your system.
Next, determine your wiring configurations. You might’ve a single push button with single chime setup or double push buttons with double chimes.
Examine the terminal labels on your transformer and chime – look for “Trans” markings for transformer connections and “Front” or “Back” for push button wires.
Before disconnecting anything, label your existing wires and photograph their current connections.
This documentation will streamline your installation process.
Use wiring diagrams specific to your doorbell type to visualize how components connect properly.
Gather All Necessary Tools and Materials Before Beginning Installation
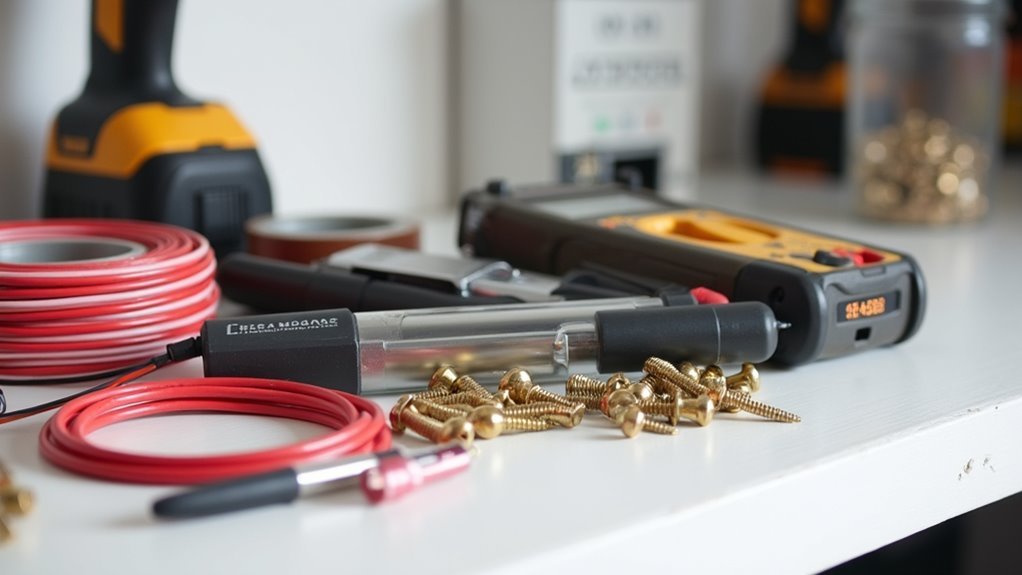
Having the right tools and materials ready will make your doorbell installation smoother and prevent frustrating mid-project trips to the hardware store.
You’ll need essential tools including a screwdriver, wire stripper, and voltage tester for safe, effective work. Gather your materials: doorbell transformer, push button, low voltage cables, and wire nuts.
Check the specifications of all components to guarantee compatibility, especially the transformer’s voltage rating, which typically ranges from 16V to 24V. Organize your workspace with everything within reach to streamline the installation process.
Before starting, review wiring diagrams specific to your doorbell setup. This preparation helps you understand proper connections and reduces installation errors.
Having everything ready eliminates interruptions and guarantees you can focus on making accurate, secure connections throughout your project.
Use Proper Wire Connection Techniques for Secure Terminals
Proper wire connections form the foundation of a reliable doorbell system that’ll function safely for years. Start by stripping about 1/2 inch of insulation from wire ends to guarantee secure connection to terminals.
When connecting wires to your transformer and doorbell components, follow manufacturer instructions precisely—the correct wire must reach its designated terminal for proper voltage flow throughout your installation.
Use wire nuts to twist and secure all wire connections, providing essential insulation that prevents dangerous short circuits.
Color-code your wires during installation—black for hot, white for neutral—and label them to avoid confusion.
After securing connections, gently tug each wire to confirm they won’t loosen over time, guaranteeing your doorbell system operates reliably.
Follow Wiring Diagrams Specific to Your Doorbell Setup Type
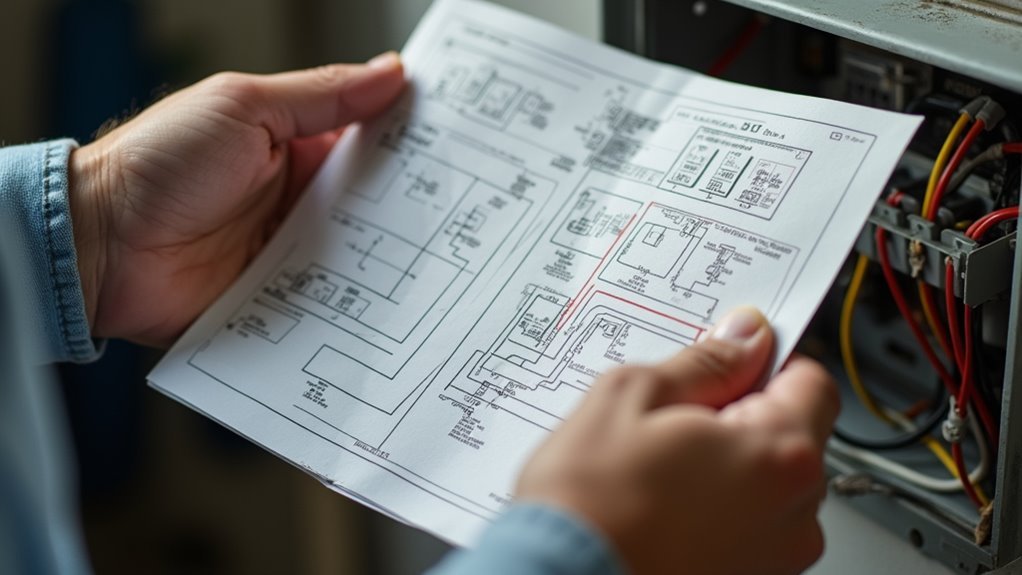
After securing your wire connections, you’ll need to reference the correct wiring diagram that matches your specific doorbell configuration.
Whether you have a single push button with single chime or double push buttons with double chimes, each setup requires different connections to your chime box and transformer.
Each doorbell configuration demands specific wiring connections between your push buttons, chime box, and transformer for optimal performance.
Before starting your installation process, identify the terminals clearly marked “Trans,” “Front,” and “Back” on your chime box.
Use color-coded wires to connect each component accurately—typically black for hot, white for neutral, and green for ground from the transformer.
Always label your existing wires with tape before disconnecting anything.
Double-check the manufacturer’s wiring diagram for any specific requirements unique to your doorbell model to guarantee proper functionality.
Test Each Connection Point During the Installation Process
You’ll need to verify power is completely off at each connection point before touching any wires to prevent dangerous electric shock.
Test each wire connection immediately after making it to confirm it’s secure and properly fastened.
Check that each component functions correctly by temporarily restoring power after connecting it, then turn the power back off before moving to the next connection.
Power Off Verification
Why risk electrical shock when a simple voltage test can keep you safe? Power off verification is your first line of defense during doorbell installation. Use a non-contact voltage tester at every connection point before touching any wires – this guarantees complete electrical safety throughout the process.
Test components individually after disconnecting them from the circuit to confirm no residual power remains. Check voltage at transformer and chime terminals with a multimeter, verifying specifications match your doorbell’s requirements before making wiring connections.
After completing installation, turn on power and test each component separately to confirm functionality.
If troubleshooting becomes necessary, always recheck connections and test voltage again to identify loose wires or other issues affecting proper operation.
Wire Connection Testing
Each connection point becomes a potential failure spot without proper testing during your doorbell installation. Wire connection testing guarantees your system works reliably from the start.
You’ll prevent frustrating troubleshoots later by verifying each connection as you make it.
Follow these essential testing steps:
- Test each connection immediately after securing the wires with wire nuts, checking for exposed ends that cause shorts.
- Press the doorbell button during temporary power restoration to confirm the chime activates correctly.
- Cross-reference wiring diagrams if the system doesn’t respond, verifying correct terminal placements.
- Document wire connections with labels or marked diagrams for future troubleshooting needs.
Don’t rush power restoration until you’ve confirmed all connections are solid.
Loose wires create intermittent problems that’ll drive you crazy later.
Component Function Checks
Before you connect any doorbell components, systematic function checks at every connection point will save you hours of troubleshooting headaches. Start by using a voltage tester to confirm power to the doorbell is completely off before touching any wires.
When you install the new transformer, verify that the low-voltage wires are securely connected to correct terminals without loose connections that cause malfunctions.
During doorbell wiring, double-check that your chime’s wires connect to properly labeled transformer connects and push button terminals. Once you connect the wires to the push button, test it immediately to confirm signal transmission.
Component function checks at each stage prevent compound problems. After completing installation, restore power and conduct a thorough final test of the entire system’s reliability.
Troubleshoot Common Wiring Issues and When to Call a Professional
When your doorbell doesn’t work after installation, you’ll likely encounter a few common wiring problems that can often be fixed with simple troubleshooting steps.
Start by checking for loose connections, testing your transformer’s voltage output, and verifying that all wires match your installation diagram.
However, if you’re dealing with complex electrical issues or don’t have existing doorbell wiring, it’s time to call a licensed electrician for safe and reliable installation.
Common Wiring Problems
Although doorbell systems appear straightforward, several wiring problems can prevent them from working correctly. Understanding these common causes helps you troubleshoot doorbell wiring issues effectively.
The most frequent problems you’ll encounter include:
- Loose connections – Check all wire nuts and terminal connections, as vibrations can cause wires to separate over time.
- Faulty transformer – Use a voltage tester to verify your transformer outputs proper voltage (typically 16-24 volts) to power your doorbell chime.
- Inconsistent power supply – Verify connections at the breaker panel and confirm adequate electrical flow throughout the system.
- Damaged wiring – Inspect for frayed, corroded, or broken wires that disrupt the electrical circuit.
When troubleshooting doesn’t resolve your issues or you’re uncomfortable working with electrical systems, consult a professional electrician for safety.
DIY Troubleshooting Steps
Identifying the specific problem with your doorbell system requires a systematic approach that starts with the most basic components. Begin by using a voltage tester to check power supply at the transformer, ensuring it’s delivering proper voltage to your doorbell chime. Inspect all doorbell wiring connections for loose wires and verify they’re securely attached with appropriate connectors.
| Problem | Solution | When to Call Professional |
|---|---|---|
| No chime sound | Check power supply, replace button | Complex wiring issues |
| Buzzing/intermittent sounds | Verify transformer voltage matches requirements | Voltage irregularities persist |
| Button unresponsive | Replace button, check connections | Multiple electrical problems |
If you’re uncomfortable with electrical work or need to install a new system, contact a licensed electrician for safe installation.
Professional Help Needed
While basic doorbell troubleshooting can resolve many common issues, certain electrical problems require professional help to guarantee both safety and code compliance.
You should contact a licensed electrician when:
- Low voltage readings or inconsistent chiming – These symptoms often indicate wiring problems that require professional assessment to confirm your system meets electrical standards and operates safely.
- Doorbell transformer compatibility concerns – An electrician can verify your transformer works with existing wiring and prevent costly component damage.
- Working with live wires – If you’re uncomfortable handling electrical connections or lack experience, professional installation protects you from potential hazards.
- Missing electrical infrastructure – Homes without proper wiring or electrical boxes need professional setup to meet local building codes and confirm long-term reliability.
Don’t risk your safety as a DIYer.
Frequently Asked Questions
Does It Matter Which Way You Wire a Doorbell?
For basic doorbells, polarity doesn’t matter since they use low voltage. However, you’ll need to follow specific wiring instructions for smart doorbells to guarantee they function properly and avoid damage.
What Are the Three Wires for Doorbell Wiring?
You’ll work with three essential wires: the hot wire (black) that delivers power, the neutral wire (white) that returns current, and the ground wire (green) for safety protection.
Do I Need an Electrician to Wire a Doorbell?
You don’t need an electrician for basic doorbell wiring if you’re comfortable with simple electrical work. However, you should hire one for complex installations or if you lack electrical experience.
Can You Hard Wire Power to Ring a Doorbell?
You can hardwire power to a Ring doorbell by connecting it to a low-voltage transformer that steps down 120V household voltage to the required 10-24 VAC range.


Leave a Reply