
You’ll need specific materials to successfully install a doorbell-free video system, but the requirements vary dramatically depending on your chosen setup. Battery-powered units demand different components than wired installations, while your home’s existing infrastructure determines whether you’ll need transformers, signal boosters, or alternative power solutions. The wrong materials won’t just complicate installation—they’ll compromise your system’s reliability and leave you vulnerable to weather damage and connectivity issues.
Essential Tools for Battery-Powered Doorbell Installation
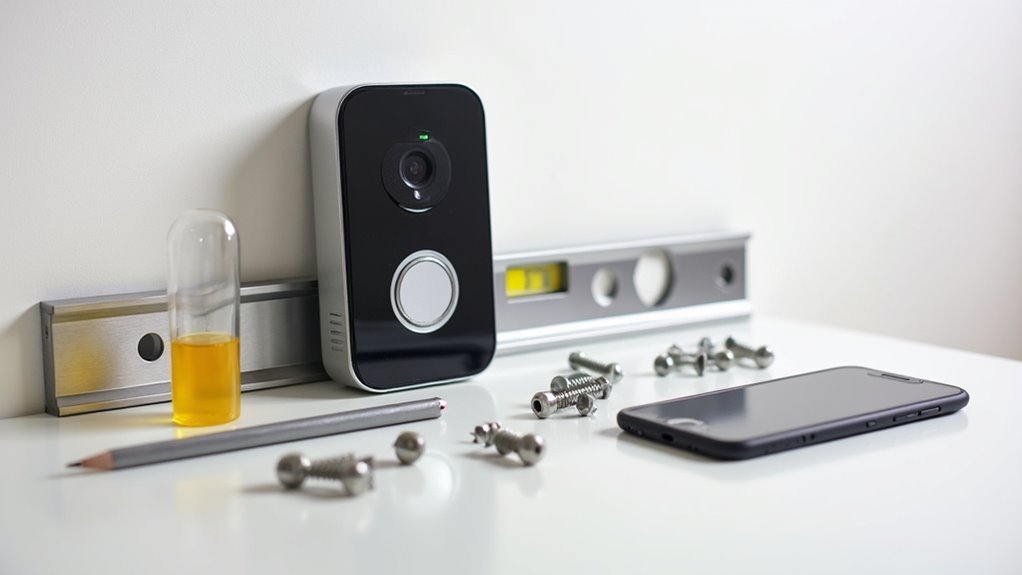
Five essential tools will streamline your battery-powered doorbell installation and guarantee professional results.
Your doorbell camera kit includes the camera unit and mounting hardware needed for setup. A power drill with appropriate bits creates precise mounting holes in different wall materials during the installation process.
A complete doorbell camera kit with mounting hardware and power drill with proper bits ensures precise installation holes in any wall material.
You’ll need a screwdriver to secure the mounting bracket and fasten screws included with your kit. A level guarantees your battery-powered doorbell mounts perfectly straight, delivering professional appearance and peak functionality.
Finally, measuring tape helps you position the device at the correct height and distance from obstacles for maximum coverage.
These essential tools transform a potentially complicated project into a straightforward DIY task that delivers reliable security monitoring.
Required Materials for Wired Doorbell Setup
You’ll need specific wiring components and power requirements to successfully install a wired doorbell system.
The most critical component is a compatible transformer that steps down your home’s 120V power to the safer 16-24V range required for doorbell operation.
Proper wiring materials and secure mounting hardware complete the essential setup requirements for a reliable wired installation.
Essential Wiring Components
Installing a wired doorbell requires several key electrical components to guarantee safe and reliable operation.
You’ll need a compatible doorbell transformer that reduces your household’s 120V power to a safer 16-24V level for the doorbell unit. This voltage reduction is vital for preventing damage and ensuring proper functionality.
For connections, you’ll require low-voltage wiring, typically 18-gauge, which links the transformer to both your doorbell and chime.
Wire connectors are essential for creating secure electrical joints between these components, preventing loose connections that could cause malfunctions.
You’ll also need a power drill with appropriate bits for mounting and creating necessary holes.
Don’t forget screws and anchors, particularly important when installing on masonry or brick surfaces where secure mounting requires additional hardware support.
Power Source Requirements
The transformer serves as your doorbell system’s heart, converting dangerous household voltage into the safe 16-24V range that doorbell components require.
Unlike a battery-operated doorbell, wired systems need consistent power supply to maintain smart features continuously.
You’ll need specific materials for installation without the need for frequent maintenance:
- Compatible doorbell transformer (16-24V output rating)
- Power drill for mounting holes and wire routing
- Wire connectors for secure electrical connections
- Voltage tester to verify power shutdown safety
- Mounting screws, anchors, and appropriate gauge wiring
Before beginning any electrical work, you must turn off power at the circuit breaker and confirm it’s off using your voltage tester.
This setup guarantees your video doorbell receives steady power for peak performance and functionality.
Power Supply Options and Transformer Requirements
You’ll need to choose between battery-powered and wired video doorbells, with each option offering distinct advantages for your installation.
Battery models provide wireless convenience but require regular charging, while wired systems deliver continuous power through your home’s electrical supply.
If you’re selecting a wired setup, you’ll need a compatible transformer that converts your home’s 120V power down to the 16-24V range required for safe doorbell operation.
Battery Vs Wired Options
When choosing between battery and wired power options for your doorbell-free video installation, you’ll face a fundamental trade-off between convenience and reliability.
Battery options offer maximum flexibility since you won’t need existing wiring or transformer compatibility. You can install them virtually anywhere without turning off circuit breakers or dealing with electrical hazards. However, you’ll need to recharge them periodically.
Wired doorbell installation provides continuous power without battery maintenance concerns. You’ll need a compatible transformer that converts 120V to 16-24V for safe operation.
Consider these key factors when evaluating your options:
- Installation complexity and available electrical infrastructure
- Maintenance preferences and accessibility requirements
- Power reliability needs for continuous operation
- Location flexibility versus permanent mounting
- Long-term operational costs and convenience factors
Transformer Installation Requirements
Before selecting a wired power option, understanding transformer requirements becomes essential for safe and reliable operation.
You’ll need a transformer that reduces standard 120V household voltage to 16-24V for your doorbell system. Choose between plug-in transformers for easy DIY installation near electrical outlets, or traditional models that connect directly to junction boxes.
Your transformer should provide 10-30 VA for adequate performance and must match your specific doorbell model’s requirements.
Mount it close to your doorbell location to prevent voltage drop that could affect functionality.
Always turn off power at the circuit breaker before beginning any installation work to avoid electrical hazards.
Proper transformer selection and installation guarantees your wired video doorbell operates reliably without compromising safety or performance standards.
Mounting Hardware and Weatherproof Components
Since your doorbell-free video camera will face constant exposure to the elements, selecting the right mounting hardware and weatherproof components becomes critical for long-term performance.
Choosing weather-resistant mounting hardware ensures your outdoor security camera maintains peak performance despite harsh environmental conditions.
You’ll need materials that can withstand moisture, temperature fluctuations, and UV exposure while maintaining structural integrity.
Essential installation components include:
- Wall-compatible anchors – masonry anchors for brick/concrete surfaces, toggle bolts for drywall
- Weather-resistant screws – stainless steel or galvanized options prevent corrosion
- Silicone sealant – creates waterproof barriers around mounting points
- UV-resistant brackets – prevent sun damage and material degradation over time
- Professional-grade level – guarantees straight camera alignment for maximum image quality
Always check for hidden wiring or plumbing before drilling to avoid costly damage during your installation process.
Wi-Fi Network Equipment and Signal Boosters
Your doorbell-free video camera’s performance hinges on reliable Wi-Fi connectivity, making network equipment selection just as important as the camera itself.
You’ll need a stable internet connection to guarantee live streaming and instant notifications work seamlessly.
Dual-band routers operating on both 2.4 GHz and 5 GHz frequencies provide peak performance, letting you choose the best band for your distance and bandwidth requirements.
Position your router centrally within your home to maximize signal strength and minimize dead zones.
Wi-Fi extenders become vital when your camera’s located far from your router or in areas with weak coverage.
These signal boosters enhance connectivity in challenging spots, assuring consistent performance.
Consider Power over Ethernet models if you’re installing in locations with persistent Wi-Fi issues.
Local Storage Solutions and Memory Cards
When selecting local storage for your doorbell-free video camera, microSD cards offer the most cost-effective solution for saving recordings directly on your device.
These flexible storage solutions eliminate monthly subscription fees while maintaining complete control over your footage.
Consider these key factors when choosing your storage:
- Capacity range: Select from 16GB to 128GB based on your recording needs
- Camera compatibility: Verify your chosen model like Reolink or Amcrest AD110 supports microSD cards
- Video quality impact: Higher resolutions like 2K require more storage space
- Recording duration: Storage capacity directly affects how long you’ll retain footage
- Privacy benefits: Local storage keeps your data secure without third-party cloud access
Video doorbells with local storage provide reliable, cost-effective recording without ongoing expenses.
Drilling Equipment and Masonry Anchors
You’ll need the right drilling equipment and masonry anchors to securely mount your video doorbell camera on brick, concrete, or stone surfaces.
Selecting appropriate drill bits for your specific masonry type guarantees clean, precise holes that won’t compromise your installation’s stability.
Understanding different anchor types helps you choose the correct fastening system that’ll distribute your device’s weight effectively and provide long-lasting security.
Drill Bit Selection
Although doorbell-free video cameras offer wireless connectivity, you’ll still need the right drill bits to mount them securely to your home’s exterior. Proper drill bit selection determines whether your camera installation succeeds or fails, especially when working with different surface materials.
Choose your drill bits based on your mounting surface:
- Masonry bits for concrete and brick surfaces
- Standard twist bits for wood and drywall materials
- 1/4 inch to 1/2 inch diameter matching your masonry anchors
- Pre-drill holes to prevent surface cracking
- Hammer drill compatibility for tough concrete installations
Always pre-drill holes to avoid damaging brittle materials during installation. A hammer drill makes penetrating concrete considerably easier by combining rotary motion with hammering action, reducing installation time and effort.
Anchor Types Guide
After drilling your pilot holes, selecting the right anchor guarantees your doorbell-free video camera stays mounted through weather, vibrations, and daily use.
Different anchor types handle varying weight support requirements across surface materials. Masonry anchors like sleeve and wedge anchors penetrate deep into concrete and brick for maximum holding power. Toggle bolts work excellently in drywall by expanding behind the wall surface. Plastic wall anchors suit lightweight installations on wooden surfaces.
| Surface Type | Recommended Anchor | Weight Capacity | Installation Tool |
|---|---|---|---|
| Concrete/Brick | Sleeve/Wedge Anchors | Heavy-duty | Masonry drill bit |
| Drywall | Toggle Bolts | Medium-heavy | Standard drill bit |
| Wood | Plastic Wall Anchors | Light-medium | Standard drill bit |
| Hollow Walls | Molly Bolts | Medium | Standard drill bit |
| Stone Veneer | Masonry Anchors | Heavy | Masonry drill bit |
Always test anchors by gently pulling before mounting your camera.
Wire Management and Cable Routing Supplies
Proper wire management transforms a potentially messy doorbell installation into a clean, professional-looking setup.
Organized wiring elevates your doorbell project from amateur DIY work to a polished, contractor-quality installation.
You’ll need specific supplies to handle cable routing effectively and guarantee your wiring stays secure and protected.
Essential wire management and cable routing supplies include:
- Cable clips or staples – Secure wiring along walls and eliminate tripping hazards while maintaining neat appearances
- Wire conduit – Protects external cables from environmental damage and improves overall aesthetics
- 18-gauge low-voltage wire – Guarantees proper compatibility with transformers and doorbell units for reliable operation
- Junction box – Manages connections on longer runs while maintaining accessibility for future maintenance
- Electrical tape or heat-shrink tubing – Insulates wire connections, prevents short circuits, and enhances long-term durability
These materials guarantee your installation looks professional while protecting your investment.
Electrical Testing Tools and Safety Equipment
You’ll need essential testing equipment to verify electrical conditions before starting your doorbell-free video installation.
Safety gear requirements include protective equipment that shields you from potential electrical hazards during the installation process.
Voltage detection tools are vital for confirming power status and ensuring you’re working in a safe electrical environment.
Essential Testing Equipment
Before starting any doorbell-free video installation, electrical testing tools and safety equipment form the foundation of a secure work environment.
You’ll need essential testing equipment to guarantee safe and accurate electrical connections throughout your project.
Your essential testing equipment toolkit should include:
- Multimeter – Measures voltage and continuity for accurate electrical connections
- Voltage tester – Confirms the absence of electricity in wiring before beginning work
- Non-contact voltage detector – Identifies live wires without direct contact for quick safety assessment
- Circuit breaker finder – Locates which circuit controls power to your installation area
- Personal protective equipment – Safety goggles and insulated gloves protect against electrical hazards
These tools minimize electric shock risks and help you identify the correct circuits to disable before installation begins.
Safety Gear Requirements
Safety gear forms your first line of defense against electrical hazards during doorbell-free video installations.
You’ll need safety goggles to protect your eyes from debris when drilling holes or mounting equipment. Insulated gloves are essential for preventing electrical shocks while handling wiring and electrical components.
A voltage tester confirms power is off before you begin any wiring work, eliminating dangerous electrical hazards. Your multimeter checks voltage levels of the doorbell transformer, guaranteeing it operates within the safe 16-24V range.
If you’re working with ladders or ceiling-mounted components, consider wearing a hard hat to protect against overhead hazards.
Don’t compromise on safety equipment—these tools prevent serious injuries and guarantee your installation proceeds smoothly without electrical accidents.
Voltage Detection Tools
Three essential voltage detection tools guarantee your electrical safety during doorbell-free video installations.
Before touching any wiring, you’ll need proper electrical testing tools to verify power is completely shut off at the circuit breaker.
- Non-contact voltage testers – Detect electrical presence without direct wire contact, preventing dangerous shocks during installation.
- Digital multimeters – Measure voltage, current, and resistance for thorough troubleshooting before final connections.
- LED indicator displays – Provide clear visual confirmation when voltage is detected in circuits.
- Audible alert systems – Sound warnings when electrical current is present, ensuring you’re always aware.
- Insulated testing probes – Offer additional protection when direct contact measurements are necessary.
These voltage detection tools include built-in safety features like bright indicators and sound alerts, giving you confident awareness of electrical conditions throughout your installation process.
Smartphone Apps and Setup Software
Since modern smart doorbell cameras rely heavily on smartphone integration, you’ll need to download and install the manufacturer’s dedicated app to complete your setup.
These smartphone apps serve as essential setup software that guides you through easy installation with step-by-step instructions requiring minimal technical knowledge.
Once installed, you’ll access powerful features like live streaming, motion alerts, and video playback directly from your phone.
Popular brands like Reolink and Wyze offer apps with advanced capabilities including person detection and customizable notification settings that enhance your overall experience.
The apps also handle vital maintenance tasks like firmware updates, ensuring your doorbell camera operates with the latest security enhancements and features.
Simply download the corresponding app from your device’s app store to begin configuration.
Backup Power Sources and Battery Packs
While traditional doorbells rely on your home’s electrical system, modern video doorbells need reliable backup power sources to secure uninterrupted security monitoring.
Rechargeable battery packs guarantee your device continues operating during power outages or when hardwiring isn’t possible.
Battery-powered video doorbells ensure continuous home security monitoring even when electrical power fails or wired connections aren’t available.
When selecting backup power sources for your doorbell-free installation, consider these essential features:
- Built-in rechargeable batteries that last several months per charge
- External battery pack compatibility for extended operational time
- Easy-access charging ports for convenient maintenance
- Weather-resistant battery housing for outdoor durability
- Low-battery alerts through your smartphone app
Battery life depends on usage frequency, motion detection settings, and video recording duration.
You’ll want to evaluate how often you’ll need to recharge and whether the battery location allows easy access for maintenance.
Outdoor-Rated Cables and Connectors
Weatherproof connections form the backbone of any reliable outdoor video doorbell installation. You’ll need outdoor-rated cables with UV-resistant insulation to prevent sunlight degradation. Choose 18-22 AWG wire gauge for low-voltage installations to minimize voltage drop over distance.
| Component | Rating Required | Key Feature |
|---|---|---|
| Cables | UV-resistant | Sunlight protection |
| Connectors | IP65+ waterproof | Weather resistance |
| Junction boxes | Outdoor-rated | Moisture prevention |
Waterproof connectors are essential for withstanding rain, snow, and temperature extremes. Install outdoor-rated junction boxes to protect all connections from moisture ingress, preventing short circuits and device failure. Use compliant outdoor extension cords or power adapters that meet local electrical codes. These materials guarantee your doorbell-free video system operates reliably regardless of weather conditions.
Wall Preparation Materials and Sealants
Beyond securing proper outdoor-rated cables and connections, you’ll need specific wall preparation materials to create a stable, weatherproof foundation for your video doorbell system.
Proper wall preparation guarantees your camera stays securely mounted while protecting against moisture damage.
Essential materials include:
- Cleaning supplies – Degreaser and cloths to make surfaces clean and free from dust or debris for ideal adhesion
- Measuring tools – Level and measuring tape for precise camera positioning and alignment
- Masonry anchors – Heavy-duty anchors and screws for brick, concrete, or stone walls requiring extra holding power
- Weatherproof sealants – Silicone caulk to seal mounting holes and prevent water infiltration
- Gap fillers – Expanding foam or additional caulk for larger spaces around mounting hardware
These materials create a professional, long-lasting installation.
Alternative Power Adapter Solutions
When you don’t have existing doorbell wiring or need to replace a faulty transformer, alternative power adapter solutions offer flexible ways to energize your video doorbell system.
A plug-in transformer provides the simplest installation option by converting standard 120V outlet voltage to the 16-24V your doorbell requires. You’ll want to position the power adapter near your doorbell location for ideal wire routing.
Before connecting any components, verify the adapter’s voltage output matches your doorbell’s specifications to prevent damage. Always turn off power at the circuit breaker when making electrical connections.
Always verify voltage compatibility and shut off power at the breaker before making any electrical connections to prevent equipment damage.
These plug-in solutions eliminate the need for hardwired transformers while providing reliable power through any nearby electrical outlet.
Frequently Asked Questions
What Is Required to Install a Doorbell Camera?
You’ll need a doorbell camera kit, power drill with bits, screwdriver, level, and measuring tape. For wired models, you might require wall anchors and a plug-in transformer depending on your installation type.
What Do I Need for a Video Doorbell?
You’ll need a doorbell camera kit, power drill, screwdriver, level, and measuring tape. If installing a wired model, you’ll also require a compatible doorbell transformer for proper voltage conversion.
What Materials Are Used to Make a Doorbell?
You’ll find doorbells made from plastic or metal housings containing circuit boards, wiring, and chime mechanisms. Smart models include glass lenses, imaging sensors, infrared LEDs, and rechargeable batteries for enhanced functionality.
How to Get a Doorbell Camera for Free?
You can get free doorbell cameras through home security company promotions, smart home brand giveaways, referral programs, or by choosing brands like Reolink that don’t require monthly subscriptions.


Leave a Reply