
You’ll want to know that installing a WiFi garage door opener isn’t as straightforward as mounting your average smart device. Your existing system’s age, safety features, and signal strength all play vital roles in determining whether you’ll need a complete replacement or can get away with a simple retrofit. Before you invest in any smart opener, there’s a specific compatibility checklist that could save you hundreds of dollars in wasted purchases.
Understanding Smart Garage Door Opener Compatibility Requirements

Before diving into installation, you’ll need to verify that your garage door system meets specific compatibility requirements for smart opener integration.
Your existing garage must have a door manufactured after 1993 with functioning safety sensors to work with most smart garage door opener models. You’ll also need a sectional door design equipped with properly working infrared photo eyes for safe operation.
Smart garage door openers require doors made after 1993 and functioning safety sensors for proper integration and safe operation.
Check your Wi-Fi signal strength around the garage area – you’ll need at least two bars for reliable connectivity.
If your current opener isn’t compatible, you can choose between purchasing a complete new smart garage door opener unit or adding a Wi-Fi hub to upgrade your existing system.
Always consult your specific model’s manual for detailed compatibility and installation requirements.
Evaluating Your Existing Garage Door System for WiFi Integration
Before installing a WiFi garage door opener, you’ll need to evaluate three critical aspects of your current system.
Start by checking your opener’s manufacturing date and safety features.
Then assess your garage’s wireless signal strength.
This evaluation process will determine whether you can upgrade your existing system or need a complete replacement.
Compatibility Check Requirements
When evaluating your existing garage door system for WiFi integration, you’ll need to verify several key compatibility factors to confirm a successful smart upgrade. First, confirm your opener was manufactured after 1993, as most smart garage door openers require this minimum age. Next, check for safety sensors (IR photo eyes) – they’re essential for compatibility with smart systems like myQ.
| Component | Requirement | Status Check |
|---|---|---|
| Manufacturing Date | Post-1993 | ✓ Required |
| Safety Sensors | IR Photo Eyes Present | ✓ Essential |
| Motor Mechanism | Electric Operation | ✓ Mandatory |
| Wi-Fi Connection | 2+ Signal Bars | ✓ Critical |
| Documentation | User Manual Review | ✓ Recommended |
Test your garage’s Wi-Fi connection strength – you’ll need at least two bars for ideal performance. Verify your motor mechanism operates electrically, enabling remote control features.
Hardware Assessment Process
After confirming your garage door opener’s basic compatibility, you’ll need to conduct a thorough hardware assessment process to determine the exact integration approach for your WiFi upgrade.
Start by examining your existing garage door hardware, particularly the motor’s condition and age. If your opener is functioning properly, you might only need a Wi-Fi hub adapter rather than replacing the entire unit with a smart garage door opener.
Check your garage’s Wi-Fi signal strength, ensuring you have at least two bars for reliable connectivity. Poor signal may require a Wi-Fi extender before proceeding with Wi-Fi integration systems.
Finally, review the installation requirements in your chosen system’s manual, as specific models may have unique mounting or wiring needs that affect your hardware compatibility assessment.
Signal Strength Evaluation
Since your garage’s WiFi signal strength directly impacts your smart opener’s performance, you’ll need to conduct a thorough signal evaluation before proceeding with installation.
Walk around your garage with your smartphone and check for at least two bars of Wi-Fi signal strength to guarantee ideal connectivity for your smart garage door opener.
If you’re experiencing weak signals, consider relocating your router closer to the garage or installing a Wi-Fi extender to boost coverage.
Test the connection at multiple points, especially near where you’ll mount the opener unit.
While evaluating connectivity, verify your safety sensors are functioning properly and review your opener’s installation requirements.
This assessment guarantees your smart system will operate reliably once installed.
Choosing Between Complete Smart Opener Units and WiFi Hub Retrofits
Before diving into installation, you’ll need to decide whether a complete smart opener unit or a WiFi hub retrofit better suits your garage setup and budget.
Complete smart opener units deliver full functionality with enhanced features straight out of the box, making them perfect for new installations or replacing outdated models. They include advanced capabilities like real-time alerts, automatic closing, and programmable schedules.
WiFi hub retrofits offer a cost-effective alternative if your existing opener was manufactured after 1993. These hubs add smart capabilities without replacing your entire system.
When evaluating options, consider compatibility with your current garage door model, essential safety features, and integration capabilities with other smart home devices. Your choice depends on your budget, existing equipment condition, and desired feature set.
Essential Tools and Components for WiFi Garage Door Installation

Success hinges on having the right tools and components ready before you begin your WiFi garage door opener installation. Your essential components depend on whether you’re installing a complete smart garage system or retrofitting an existing opener made after 1993.
You’ll need either the smart opener unit or a compatible Wi-Fi hub with mounting hardware.
Basic installation tools include:
- Screwdriver and drill – for securing the opener to your garage ceiling
- Level – ensuring proper alignment during mounting
- Safety sensors – critical components for detecting obstructions
Don’t forget to download the mobile app before starting your opener installation. This enables remote monitoring capabilities and completes your smart garage system setup.
Verify you have a stable Wi-Fi signal with two or more bars in your garage for ideal performance.
Step-by-Step Hardware Installation and Mounting Process
You’ll need to verify your existing opener’s compatibility with safety sensors before starting the installation process.
Next, you’ll mount the smart hub or opener unit securely to your garage ceiling within 3-5 feet of your current system.
Finally, you’ll position the door status sensor correctly on your garage door to guarantee accurate open and closed detection.
Pre-Installation Compatibility Check
While smart garage door openers offer convenient remote access, they’ll only function properly when your existing system meets specific compatibility requirements.
Your pre-installation compatibility check starts with verifying your existing garage door opener was manufactured after 1993 and includes safety sensors, which are essential for smart garage door systems integration.
Next, test your garage’s Wi-Fi signal strength to verify at least two bars of moderate connectivity. Poor signal will cause unreliable smart functionality and connection drops.
Essential compatibility verification steps include:
- Testing your garage’s wireless connectivity by checking signal bars on your smartphone near the installation area
- Inspecting safety sensor alignment to verify proper door status sensor communication with your existing system
- Confirming mounting space availability on your garage ceiling for secure smart opener installation
Mounting Hardware Components
For Wi-Fi hub installation, mount it within 3-5 feet of your existing garage door opener to maintain ideal signal strength and connection stability.
Position all safety sensors at the bottom of your door tracks to prevent operational accidents.
After completing the mounting process, double-check all connections and fasteners before moving to app setup and testing phases.
This guarantees both safety and functionality.
Sensor Placement Setup
With your mounting hardware securely in place, proper sensor placement becomes the next critical step for reliable WiFi garage door operation.
Start with your garage door completely closed to guarantee accurate position tracking during installation. Clean the mounting surface thoroughly, then attach the sensor using provided adhesive or screws for maximum security.
Position the sensor at least 6 inches from the garage door’s top edge to prevent operational interference while maintaining alignment with your system. For ideal connectivity, mount your Wi-Fi hub within 3-5 feet of your existing opener using the included hardware.
- Clean mounting surface – visualize removing dust and debris with a damp cloth
- Measure 6-inch clearance – picture using a ruler from the door’s top edge
- Test hub proximity – imagine checking signal strength from multiple positions
Configuring WiFi Connection and Network Settings
Compatibility serves as your starting point when configuring your garage door opener’s WiFi connection. Check your manufacturer’s specifications to verify your device supports 2.4 GHz wireless standards before attempting to install a garage door opener’s network settings.
Position your Wi-Fi router within two to five feet of the opener during setup for ideal signal strength. If you’re experiencing weak connectivity, consider adding a Wi-Fi extender to boost performance.
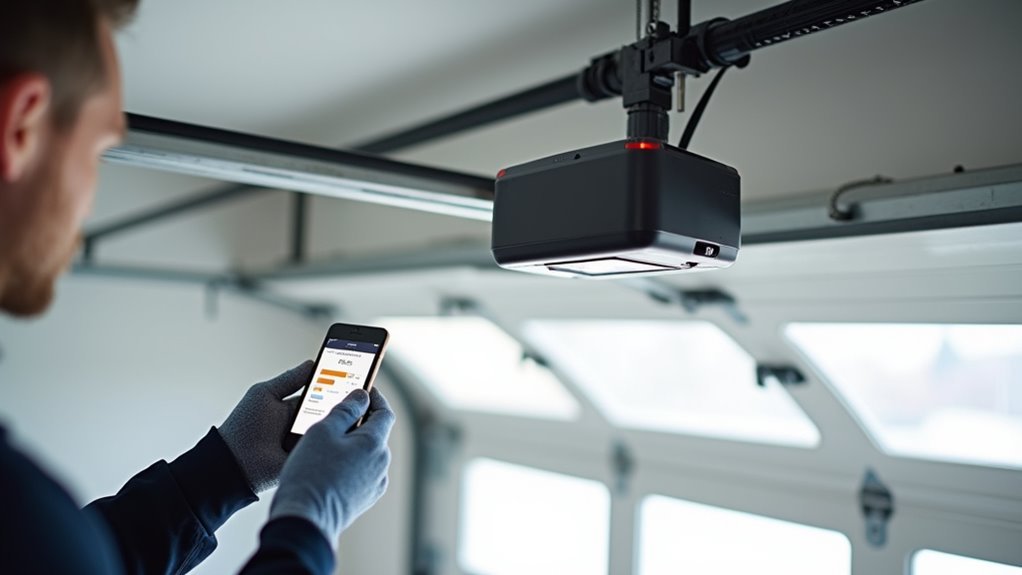
Activate pairing mode by pressing the yellow Wi-Fi setup button three times on your opener. Download the myQ app and create your account to establish the connection between your garage door opener and home network.
Test functionality by opening and closing your door through the app, confirming proper response and notification features work correctly.
Installing and Positioning Door Status Sensors
Once you’ve established your WiFi connection, installing door status sensors becomes your next critical step for complete garage door automation. These sensors work with your garage door opener to provide real-time notifications about your door’s open and close status.
Position your sensor at the garage door’s top or center for ideal tracking accuracy. The sensor must align perfectly with its corresponding wall component to maintain proper communication. Confirm you’ve got a clear line of sight between components—any obstructions will interfere with detection capabilities.
Make sure the sensor is securely mounted using the provided adhesive or screws. Keep it level to prevent miscommunication issues.
- Sensor glowing steadily as it detects door position changes
- Clear pathway between door and wall components without interference
- Level mounting ensuring consistent communication signals
Test functionality through your app to confirm accurate status reporting.
Mobile App Setup and Account Configuration
After installing your door sensors, you’ll need to set up the mobile app to control your smart garage door opener remotely.
Start by downloading the manufacturer-specific app from your device’s app store—for example, the myQ app if you’re using a Chamberlain system.
Once downloaded, you’ll create an account with your email and a strong password to secure your garage door access.
App Download Process
How do you get started with your WiFi garage door opener’s mobile app? Simply search for your specific garage door opener app (like myQ or Meros) in the Apple App Store or Google Play Store.
Once you locate it, tap “Download” to install it on your mobile device. This smartphone app becomes your primary tool to monitor and control your garage remotely.
The app to open your garage door requires proper installation before you can access its features:
- Picture yourself downloading the sleek interface that’ll transform your phone into a remote control
- Visualize the installation progress bar filling up as your device prepares for smart home integration
- Imagine having instant garage access right from your pocket anytime, anywhere
After installation completes, you’re ready for account setup.
Account Creation Steps
With your app successfully downloaded, you’ll need to create an account to access your garage door opener’s smart features.
Open the myQ app and select “create a new account” by entering your email address and choosing a strong password. You’ll receive a verification email that requires clicking a confirmation link to activate your account.
Once verified, log into your myQ garage door opener app and configure your account settings.
Enable home data sharing for enhanced functionality and turn on push notifications to receive alerts about garage door activity. These settings optimize your smart garage door opener’s performance and keep you informed of any movement.
After completing these steps, you’re ready to connect it to your Wi-Fi network and pair your device.
Testing Remote Operation and Voice Control Integration
Once you’ve completed the initial installation, you’ll need to verify that your smart garage door opener responds reliably to remote commands and voice controls.
Test your remote control functionality by opening and closing the garage door from various locations using your smartphone app. This guarantees the Wi-Fi signal reaches your device effectively throughout your property.
For voice control integration, activate your smart assistant and use commands like “Hey Google, close the garage door” or “Siri, open the garage.”
Monitor your garage door’s real-time notifications on your smartphone to confirm the system sends alerts when opening or closing. Customize alert settings to receive warnings when your garage remains open for extended periods, enhancing both security and convenience.
- Watch for instant smartphone notifications confirming each door movement
- Listen for your smart assistant’s verbal confirmation after voice commands
- Observe smooth, responsive door operation from multiple testing locations
Troubleshooting Common WiFi Garage Door Opener Issues
When your WiFi garage door opener isn’t working properly, you’ll need to systematically identify and resolve the underlying connectivity or hardware issues.
Start by checking your Wi-Fi signal strength near the garage – you’ll need at least two bars for reliable operation. If your garage door opener stops responding, unplug it for several minutes, then reconnect to reset the system.
A weak WiFi signal is the most common culprit behind garage door opener connectivity failures.
Update your smart garage door opener app to the latest version, as outdated software causes operational problems.
Verify your opener’s compatibility with smart systems, since older models may not integrate properly with WiFi hubs.
When you’re not receiving notifications about door status, enable push notifications in your app settings and confirm your device has proper permissions configured.
Frequently Asked Questions
How to Set up Wi-Fi Garage Door Opener?
First, you’ll download the opener’s app and create an account. Next, you’ll install the Wi-Fi hub near your opener, attach the door sensor, and pair everything through the app before testing.
How Do I Know if My Garage Door Opener Is Myq Compatible?
Check if your opener was made after 1993 and has safety sensors. Look for a myQ logo or green learn button. Use the manufacturer’s compatibility checker tool online for confirmation.
How to Program a Wireless Garage Door Remote?
Press and hold your garage door opener’s “Learn” button until the light turns on. Then press your remote’s button within 3-5 feet range. The light’ll blink, confirming successful programming.
Is Having a Smart Garage Door Opener Worth It?
You’ll find smart garage door openers worthwhile since they’re affordable, provide convenient remote access, send security alerts, integrate with smart homes, and easily upgrade existing systems without replacing hardware.


Leave a Reply