You’ll transform your irrigation system from a manual chore into an intelligent, automated network that responds to weather conditions and saves water. Installing a WiFi sprinkler controller isn’t as complicated as you might think, but there’s a specific sequence you must follow to avoid damaging your existing zones or creating connectivity problems. One wrong wire connection can leave half your lawn without water for weeks.
Choosing the Right WiFi Sprinkler Controller for Your System

When upgrading to a WiFi sprinkler controller, you’ll need to verify compatibility with your existing irrigation system since not every controller works with all setups or manufacturers.
Choose the right controller by ensuring it supports multiple zones that match your current system’s configuration for thorough coverage and control.
Prioritize controllers with smart watering features that automatically adjust schedules based on local weather conditions, promoting efficient water conservation.
Don’t overlook the user interface and app functionality—an intuitive app greatly enhances your irrigation management experience.
Additionally, verify the controller has firmware update capabilities. Regular updates improve performance and introduce new features over time, ensuring your investment remains current with evolving technology and capabilities.
Essential Tools and Materials for Installation
After selecting your ideal WiFi sprinkler controller, you’ll need to gather the proper tools and materials before beginning installation.
Essential tools include wire strippers, flathead and Phillips screwdrivers, and pliers for securely disconnecting and connecting wires. A multimeter helps check voltage levels in your existing system to guarantee compatibility with the new controller.
A multimeter is crucial for verifying your existing system’s voltage compatibility before installing the new WiFi controller.
You’ll also need a level and measuring tape to mount the controller securely at the correct height. Additional materials like electrical tape and zip ties will help organize and secure wiring during installation, preventing interference or damage.
Don’t forget your smartphone or tablet – it’s necessary for downloading the corresponding app for WiFi controller setup and configuration. Having these items ready guarantees a smooth installation process.
Safety Preparations and Power Disconnection

Before you touch any wires or begin removing your old sprinkler controller, prioritizing safety measures will protect you from electrical hazards and guarantee a successful installation. Proper safety preparations and power disconnection are absolutely critical for this project.
Follow these essential steps for safe installation:
- Turn off power completely at the main circuit breaker to eliminate all electrical hazards before starting any work on your system.
- Disconnect the backup battery from your existing controller to prevent dangerous power surges during the wiring process.
- Use only insulated tools when handling electrical connections to minimize shock risks and protect yourself from injury.
- Photograph existing wiring before disconnection to verify you’ll reconnect everything correctly to your new WiFi controller.
Always confirm the work area is completely dry before proceeding.
Removing Your Old Sprinkler Controller
Removing your old sprinkler controller requires careful attention to preserve the existing wiring configuration for seamless shift to your new WiFi unit. Before starting, take a clear photograph of the wiring layout to reference during installation. Unplug the power source and remove backup batteries for safety.
| Step | Action |
|---|---|
| 1 | Photograph existing wire connections |
| 2 | Disconnect power and remove batteries |
| 3 | Label wires by zone and color code |
| 4 | Remove controller from mounting bracket |
When you disconnect the existing wires, use the spring-loaded connectors and make sure to note each zone’s color coding. Remove the old unit from its mounting location, taking out all anchors and screws. Dispose of the controller responsibly or keep functional components for future use.
Documenting Existing Wiring and Zone Configuration

While installing a WiFi sprinkler controller requires precision, documenting your existing wiring and zone configuration sets the foundation for a successful upgrade.
Taking detailed notes and photos prevents costly mistakes and guarantees your new system operates correctly from day one.
Proper documentation eliminates guesswork and ensures your WiFi sprinkler upgrade functions flawlessly without expensive troubleshooting delays.
Follow these essential steps for documenting existing wiring:
- Take clear photos of all wire connections before disconnecting anything, capturing color codes and terminal positions.
- Label each zone in your system with masking tape or permanent markers for easy identification.
- Count and document the total number of zones you’re managing (typically 6-12 zones for residential systems).
- Create a zone map showing which areas each zone controls in your landscape.
After installation, verify each zone’s functionality through your new controller’s app interface to confirm proper connections.
Mounting Your New WiFi Controller
You’ll need to select a preferred mounting location that balances easy access to controls with strong WiFi signal reception.
Clear the wall surface of any old anchors or obstructions, then cut a mounting board to size if needed for enhanced stability and appearance.
Position the controller at a comfortable height where you can easily reach all buttons and programming features.
Choosing Mount Location
The location you select for your WiFi sprinkler controller directly impacts its performance and longevity. Your mounting location needs careful consideration to guarantee reliable operation and easy maintenance access.
Here are four essential factors for choosing the ideal spot:
- Protection from elements – Select a sheltered area away from direct sunlight and harsh weather conditions to prevent damage and overheating.
- Strong WiFi signal – Test signal strength at your intended mounting location before installation to guarantee consistent connectivity.
- Accessible height – Mount the controller around eye level for comfortable manual adjustments and programming without requiring ladders or tools.
- Interference-free zone – Avoid areas near metal objects or electronic devices that could disrupt your WiFi signal and system functionality.
Securing Controller Hardware
Once you’ve identified the perfect location, mounting your WiFi controller requires attention to detail and proper technique. Start by verifying your mounting surface is completely clean and free of unnecessary anchors or obstructions for a flush fit.
| Step | Action | Purpose |
|---|---|---|
| 1 | Clean mounting surface | Guarantees flush installation |
| 2 | Install mounting bracket | Provides stable base |
| 3 | Verify signal strength | Confirms reliable connectivity |
Use a sturdy piece of wood or dedicated mounting bracket to create a stable foundation. This maintains peak performance and accessibility. Confirm your chosen location has adequate signal strength before proceeding, as poor connectivity affects functionality. Follow manufacturer guidelines for mounting height and orientation to protect from elements while maintaining accessibility. Finally, securely fasten all wiring connections to prevent accidental disconnections.
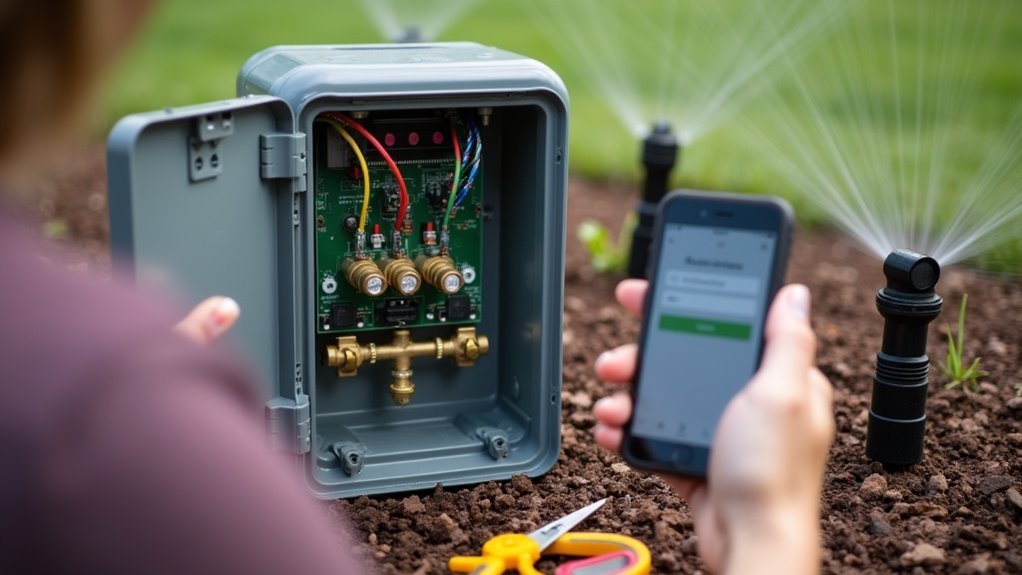
Connecting Zone Wires to the New Controller
Before touching any wires, snap a clear photo of your existing controller’s wiring configuration – this simple step will save you troubleshooting headaches later.
Now you’re ready to connect your zone wires to the new controller systematically.
Follow this step-by-step process:
- Match wire colors – Use the color codes in your controller’s manual or existing sprinkler system markings to identify each zone wire’s destination terminal.
- Secure connections – Attach zone wires using spring-loaded connectors, ensuring they’re firmly seated to prevent watering malfunctions.
- Power up – Restore power and verify the controller recognizes all connected zones.
- Test zones – Run manual tests through the controller or app to confirm your wiring configuration is correct and all zones operate properly.
Downloading and Setting Up the Controller App
With your zone wires properly connected, you’ll transform your sprinkler system into a smart, remotely controlled network by downloading the manufacturer’s app.
Search your device’s app store for either the Rain Bird or Orbit Beehive app to begin the controller setup process.
Before launching the app, confirm your smartphone or tablet connects to a stable WiFi network. This guarantees smooth communication during setup.
A stable WiFi connection is essential before starting the app setup to ensure seamless controller pairing.
Open the app and select “Add Controller” to start pairing with your sprinkler system.
The app will guide you through entering your WiFi network credentials. Follow each on-screen prompt carefully to complete the setup process.
Once finished, verify successful connection by checking for confirmation within the app interface, indicating your controller is properly linked to your home network.
Establishing WiFi Connection and Network Pairing
You’ll need to establish a stable WiFi connection between your sprinkler controller and home network to enable remote access and control.
This process involves configuring your network settings, pairing the controller with your WiFi, and addressing any connection issues that may arise.
Let’s walk through the essential steps to get your system connected and troubleshoot common problems you might encounter.
Initial WiFi Setup Process
Once the LNK WiFi Module is properly inserted into your controller’s Accessory Port, you’ll notice it blinking red and green, indicating it’s ready for setup.
Follow these steps to complete your WiFi connection:
- Launch the Rain Bird app and tap “Add Controller” to start the setup process.
- Enter your network credentials when prompted, ensuring you’re connecting to a 2.4GHz network (most controllers don’t support 5GHz).
- Wait for the pairing process to complete while the app communicates with your controller.
- Verify successful connection by checking for a solid green light on the WiFi module.
If you encounter any issues during setup, consult the troubleshooting guide for common error messages and router configuration solutions.
Network Configuration Steps
Network configuration requires three essential steps to establish a reliable connection between your sprinkler controller and home WiFi network.
First, you’ll verify the LNK WiFi Module is properly seated in the Accessory Port and blinking alternately red and green, confirming it’s ready for pairing.
Second, launch the Rain Bird app and select “Add Controller” to initiate the WiFi setup process. Follow the on-screen prompts carefully as they guide you through each configuration step.
Third, input your network credentials accurately when prompted.
Let’s take a look at signal strength requirements – guarantee adequate WiFi coverage reaches your controller’s location.
Once connected, your sprinkler system will communicate seamlessly with the app, allowing remote monitoring and control of your irrigation schedules and settings.
Connection Troubleshooting Tips
When WiFi connection issues arise, start by confirming the LNK WiFi Module’s placement in the Accessory Port. Proper troubleshooting requires systematic steps to restore connectivity between your controller and network.
- Verify module status – Check that the WiFi module blinks alternately red and green, indicating readiness for connection. If blinking incorrectly, press the module’s button to reset its status.
- Confirm network alignment – Ascertain your smartphone connects to the same WiFi network you’re linking the controller to during the app connection process.
- Check router settings – Verify your router allows device connectivity and review common error messages in the troubleshooting guide.
- Update firmware regularly – Check for firmware updates within the app to maintain peak performance and resolve existing connection stability issues.
Testing Individual Zones Through the App
Testing each sprinkler zone individually guarantees your WiFi controller system operates correctly before committing to an automated schedule. Open your controller’s app interface and select the desired zone from your configured list. Tap the “Run” or “Test” button to initiate manual activation, typically lasting one minute.
Monitor each zone’s performance during testing, checking for leaks, broken sprinkler heads, or inadequate spray patterns that could affect watering coverage.
Use the app’s feedback features to name each zone and assign identifying images. This organization helps you quickly locate specific areas during future tests or programming adjustments.
After completing your zone tests, review the observed performance data and adjust your watering schedules accordingly. These modifications optimize irrigation efficiency and ascertain each area receives appropriate coverage based on its unique requirements.
Programming Watering Schedules and Zones
After confirming your zones function properly, you’ll create customized watering schedules that match each area’s specific requirements.
Programming your WiFi controller involves setting precise start times and durations for different plant types and soil conditions.
Most controllers offer multiple programs (A, B, C) for organizing various watering schedules across your zones:
- Set specific start times – Schedule early morning watering to minimize evaporation and maximize absorption.
- Adjust durations per zone – Flower beds typically need shorter cycles than grass areas.
- Enable smart features – Activate weather-based adjustments and soil moisture tracking for ideal efficiency.
- Configure rain delays – Set automatic postponements when recent rainfall makes watering unnecessary.
Test each programmed schedule initially to verify timing and coverage before relying on automated operation.
Configuring Smart Weather-Based Watering
Smart weather-based watering transforms your basic irrigation schedule into an intelligent system that responds to real-time environmental conditions.
You’ll configure your WiFi controller to connect with local weather stations, enabling automatic schedule adjustments based on rainfall and temperature data. Set up rain delay options between 1-3 days to prevent unnecessary watering after precipitation events.
Enable soil moisture tracking to receive real-time readings that guarantee irrigation occurs only when needed. Your system will make dynamic adjustments by modifying or skipping watering cycles when rain is forecasted.
Smart soil sensors eliminate guesswork by delivering precise moisture data, ensuring your irrigation system waters only when plants actually need it.
Program multiple schedules (A, B, C) for different zones, customizing soaking times and frequency based on specific plant requirements. This intelligent approach optimizes water efficiency while maintaining healthy landscapes through precise, data-driven irrigation management.
Troubleshooting Common Connection Issues
When WiFi sprinkler controllers fail to establish proper connections, you’ll need to systematically diagnose the underlying issues to restore functionality. Effective troubleshooting begins with checking basic hardware components and network settings.
Follow these steps to resolve connection issues:
- Verify LNK WiFi Module installation – Confirm it’s properly inserted into the Accessory Port and displays alternating red and green blinking lights, confirming readiness for connection.
- Check device network settings – Verify your smartphone connects to the correct WiFi network before attempting controller pairing through the app.
- Review error messages – Examine specific app connection errors and consult troubleshooting articles for targeted solutions.
- Update firmware and check router – Keep controller firmware current and examine router firewall configurations that might block device communication.
Optimizing Performance and Maintenance Tips
You’ll maximize your WiFi sprinkler controller’s lifespan and efficiency by establishing a consistent maintenance routine.
Start by setting up automatic firmware updates to guarantee you’re always running the latest software with improved features and security patches.
Create a monthly schedule to test each zone’s functionality and calibrate your weather data settings to match local conditions accurately.
Regular Firmware Updates
Modern WiFi sprinkler controllers rely heavily on their firmware to deliver superior performance, making regular updates vital for maintaining peak functionality.
These firmware updates enhance connectivity stability, fix bugs, and introduce new features that optimize your watering schedules.
You’ll want to check for updates regularly through your controller’s app settings.
Here’s how to stay current:
- Enable automatic notifications in your app if available to receive alerts about new updates
- Check manufacturer release notes to understand what improvements each update provides
- Schedule monthly manual checks for controllers that don’t offer automatic notifications
- Install updates promptly to prevent WiFi connectivity issues and security vulnerabilities
Staying updated guarantees your sprinkler system operates seamlessly while taking advantage of the latest technological improvements.
Zone Testing Schedule
Beyond keeping your firmware current, establishing a systematic zone testing schedule forms the backbone of effective sprinkler maintenance.
You’ll want to run each zone for at least one minute to verify functionality and proper water distribution throughout your sprinkler system.
Use your Rain Bird or Beehive app to manually activate zones during testing, allowing immediate observation of watering performance irregularities.
Monitor each zone carefully for leaks, uneven coverage, or clogged heads, then address issues promptly.
After zone testing, adjust your watering programs based on results. Each area needs different water amounts—flower beds versus grass have distinct requirements.
Schedule regular re-testing seasonally or after significant weather changes to maintain peak performance and adapt to new environmental conditions.
Weather Data Calibration
When your WiFi sprinkler controller accurately connects to local weather data, it transforms from a basic timer into an intelligent watering system that responds to real-time conditions.
Proper calibration guarantees you’re getting maximum efficiency from your smart watering features.
Follow these steps to optimize your weather data calibration:
- Integrate a nearby weather station through your controller’s app to receive accurate rainfall and temperature information specific to your location.
- Enable smart watering features that automatically adjust schedules based on current weather conditions, reducing watering during rain and increasing it during dry periods.
- Monitor soil moisture levels regularly through the app to fine-tune watering schedules and prevent over or underwatering.
- Update firmware consistently as manufacturers release improvements for weather data accuracy and system performance.
Frequently Asked Questions
How to Install Wifi Sprinkler Controller?
You’ll download the controller’s app, insert the WiFi module into the accessory port, connect through the app using your WiFi credentials, wire according to color codes, then test each zone’s functionality.
Are Wifi Sprinkler Controllers Worth It?
You’ll find WiFi sprinkler controllers worth the investment since they reduce water usage by 30%, offer convenient remote control, integrate with smart homes, and provide long-term savings that offset initial costs.
How to Install a Sprinkler System Step by Step?
You’ll need to plan your layout, dig trenches for pipes, install the main water line connection, place sprinkler heads strategically, run control wires, mount your timer, and test each zone thoroughly.
What Does Program a and B Mean in a Sprinkler System?
Program A and B are separate watering schedules you can customize for different zones. You’ll set unique start times, durations, and frequencies for each program to meet your lawn’s and garden’s specific watering needs.


Leave a Reply