You’ve probably looked at those expensive electrician quotes and wondered if you could tackle smart outlet installation yourself. The good news? You absolutely can, and it’s more straightforward than you’d expect. With basic tools and careful attention to safety, you’ll transform ordinary outlets into intelligent power sources that respond to your voice commands and smartphone apps. But there’s one critical step most DIYers overlook that could make or break your entire project.
Gather Essential Tools and Safety Equipment

Before you start wiring smart outlets, you’ll need to gather the right tools and safety equipment to guarantee a smooth and secure installation.
Essential tools include a screwdriver set with both flathead and Phillips heads for removing faceplates and securing the outlet. Wire strippers are vital for preparing cables, while needle-nose pliers help handle wires effectively. A non-contact voltage tester guarantees you can safely check power status before beginning work.
Don’t forget electrical tape for securing connections and preventing shorts. Safety should be your top priority—wear appropriate protective gear and always turn off power at the circuit breaker before starting any installation work.
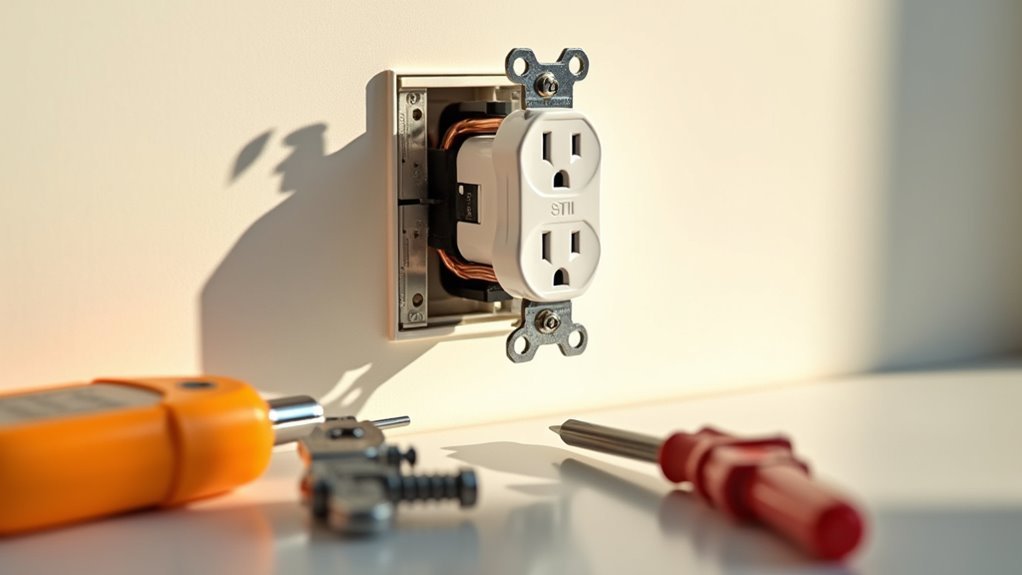
Turn Off Power and Remove Existing Outlet
Safety becomes your first priority when you’re ready to begin the installation process.
Turn off power at the circuit breaker before touching any wiring components. Use a non-contact voltage tester to verify the existing outlet is completely de-energized. This step prevents dangerous electric shocks during installation.
Remove the faceplate by unscrewing it with a flathead screwdriver.
Next, disconnect the outlet from the wall by loosening the mounting screws that secure it in place. Work carefully to avoid damaging the existing wiring behind the outlet.
Before proceeding further, examine the wire connections closely or take a reference photo.
You’ll need this information when connecting your new smart outlet. Document how each wire attaches to guarantee proper reconnection during installation.
Connect Wires to Smart Outlet Terminals

With your existing outlet safely removed and documented, you’re ready to make the wire connections to your new smart outlet. Proper wire identification guarantees electrical safety and ideal functionality for your installation.
- Connect the ground wire – Attach the bare or green ground wire to the green screw terminal, creating a secure connection that protects against electrical faults.
- Attach the neutral wire – Connect the white neutral wire to the silver terminal, verifying it’s firmly tightened to prevent loose connections.
- Connect the hot wire – Fasten the black or red hot wire to the brass terminal, double-checking that all connections are properly secured.
- Install and test – Carefully push the smart outlet into the wall box, secure it in place, then restore power to verify functionality.
Secure Smart Outlet and Restore Power
After making solid wire connections, you’ll need to carefully position the smart outlet into the wall box without pinching or damaging the wires behind it.
Push the outlet gently into the electrical box, ensuring it sits flush with the wall surface. Use the provided screws to secure it in place firmly.
Before you restore power, double-check that all connections are tight and inspect for any exposed wires that could create hazardous conditions.
Replace the faceplate for a finished appearance and safety protection.
Head to your circuit breaker and turn the power back on.
Now it’s time to test functionality – verify your smart outlet responds correctly to your smartphone app or smart home system.
Completing these DIY projects successfully requires patience and attention to detail.
Configure Wi-Fi Connection and Smart Features

Now that your smart outlet is installed and powered on, you’ll need to connect it to your home’s Wi-Fi network to access its intelligent capabilities.
Connecting your smart outlet to Wi-Fi unlocks its full potential for automated home control and energy management.
Configure your smart outlet by ensuring it’s connected to a 2.4GHz network, as most don’t support 5GHz bands.
- Download the manufacturer’s app from your app store (like Lumary app) and create an account to manage your smart outlet settings.
- Pair your device by pressing the pairing button until the indicator light flashes, then follow the app’s connection instructions.
- Customize smart features by setting schedules and routines for ideal energy efficiency, controlling when devices turn on or off.
- Integrate voice assistants like Amazon Alexa or Google Home for hands-free voice control and enhanced automation capabilities.
Frequently Asked Questions
How to Wire an Outlet Step by Step?
Turn off power at the breaker, remove the old outlet, connect ground to green screw, neutral to silver, hot to brass. Secure outlet, replace faceplate, restore power, and test functionality.
How to Connect a Smart Outlet?
Turn off power at the breaker, then disconnect your old outlet. Connect the ground wire to green, neutral to silver, and hot to brass screws on your smart outlet before testing functionality.
Is It Better to Wire Outlets in Series or Parallel?
You should wire outlets in parallel, not series. Parallel wiring guarantees each outlet receives full voltage, maintains device independence, provides system reliability if one fails, and meets electrical code requirements.
Do Smart Outlets Need a Neutral Wire?
Most smart outlets need a neutral wire to function properly and maintain Wi-Fi connectivity. If you’re in an older home without neutral wires, you’ll need special smart outlets designed for two-wire systems.


Leave a Reply